Adding a single device
This example will explain the following steps within GoBright View:
- Create a new device
- Activating the device
- Create a new resolution
- Adjust a template
For a customer in London, we’re adding a new device in their environment on the first-floor reception desk. It’s a full HD screen, but the orientation is portrait. This means in addition to configuring the device, we’ll need to create a resolution and a template. We’ll outline each step below:
Create a new device
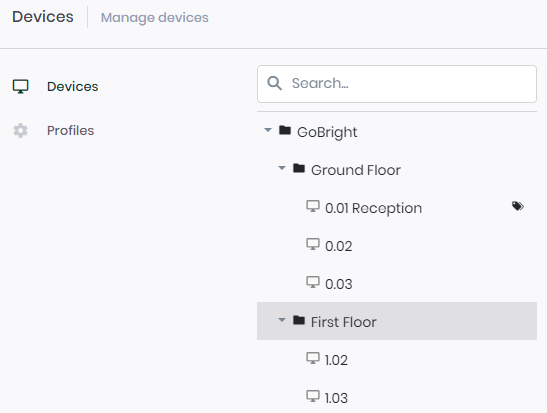
Go to the Devices tab and a hierarchy of folders will be shown, similar to the screenshot below:
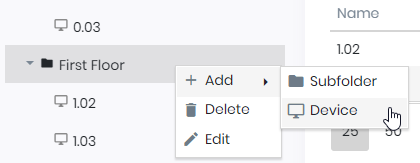
We’ll be adding a new device on the first floor so we start by selecting the First Floor folder:
- Select the First Floor folder with the left mouse button
- Press the Right mouse button once to open a new menu
- Select the Add option from the menu
- Select the Device option
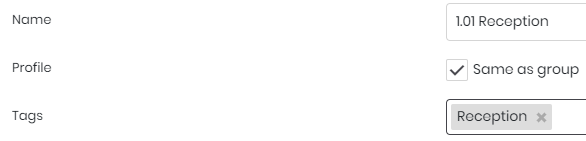
Now a new screen will pop up on the right side that displays information about the new device. Enter the details of the device using the name and tag provided in the image below:
Press the green Save button on the top right corner and the device has been successfully added

Activating the device
In order to activate the device, the GoBright app must be installed. Windows players come with GoBright View pre-installed. If you are using a LG webOS device, please read this installation guide.
After the app has been installed the device can be activated within the GoBright View Portal. Go to the Devices tab and select the device. Press the Activate button.

Enter the Activation code that is being displayed on the device and press the Activate button again.
Create a new resolution
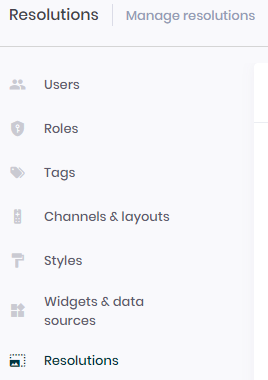
Now that the device has been activated it’s possible to create content, we’ll need to create a resolution that matches the device. First, go to the Management tab > Resolutions:
This will display the currently created resolutions. Add a new resolution and enter the following details to create a full HD portrait resolution:

Next, we’ll have to add the new resolution to the existing channel. Open Channels & layouts and select the first Channel. This will open the channel content and displays a list of all resolutions, we’ll need to check the new resolution so it will be selected:
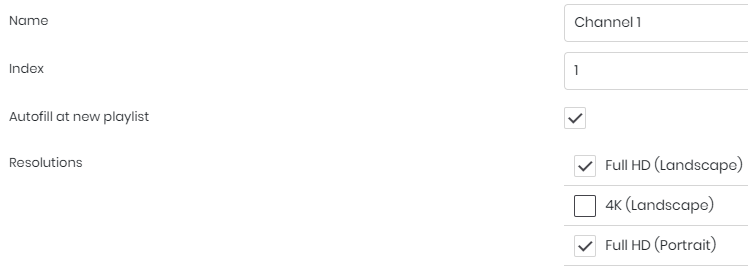
Use the same zone within the Resolution tab of the Channel as the one that is used for the landscape resolution. Flip the width and height so it matches the portrait dimensions.

Finally, save the channel and we’re ready to create the content.
Adjust a template
Each template or slide supports multiple resolutions. This means that a single design can be re-used for different devices, even when they are portrait or landscape orientated. The steps below can be applied either to an (existing) template or slide:
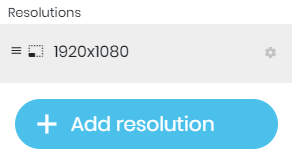
- Press the settings icon on the top of the screen to open the settings

- Press the Add resolution button on the bottom of the settings
- A pop-up will open and a few fields must be configured
- Select the resolution we want to use, in this case, 1080×1920
- Copy the settings from the existing resolution 1920×1080
- The width and height should now match the resolution we want to use
- Press the add button on the bottom

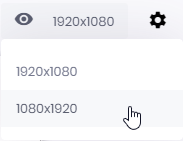
Selecting the eye icon on the top of the screen will now display two resolutions to choose from. We are able to switch between these resolutions and design them accordingly. When the template or slide is used within a playlist it will automatically detect which resolution the device is using and show the specific design when playing.
When you are happy with your content, send it to the player using the update content button.