Channels & Layouts
Before we are able to schedule content on a device, we need to define the ‘Channels‘. In short, these are similar to television channels that can be changed on the device. There a few fundamental elements that form channels:
- Resolution, this is the resolution used by the device. It’s important to know which resolution(s) the device(s) support and the most optimal one that can be used.
- Zone, this is a part of the screen that is used to display a playlist. Multiple zones can be used within a single resolution to divide the screen into several parts.
- Channel, the combination of multiple resolutions and zones.
We’ll discuss each element below and how they are configured.
Resolution
Each device will display content in a certain resolution. One of the most common examples is FullHD, which is used by a lot of devices. We’ll use this as an example to explain how the resolution is configured within GoBright.
The first thing to know is that resolutions are always configured in pixels based on their width and height. For FullHD we’re setting the width to 1920 pixels and the height to 1080 pixels, In order to create a new resolution follow the steps below:
- Press the management tab
- Select Resolutions on the left-hand side
- Press the Add button on the top-right
- Fill in the details Name, Width & Height
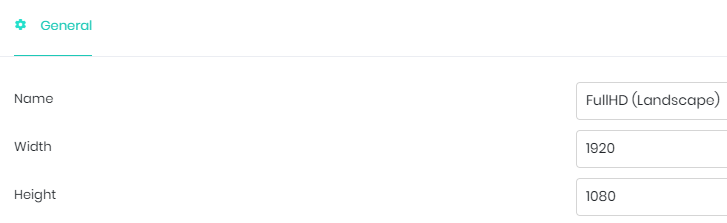
In the example above we named the resolution to FullHD (Landscape). That is because our screen is orientated horizontally. For a vertically orientated screen, we would swap the width and height and name it FullHD (Portrait). These two resolutions are by default added within GoBright.
Zone
The zone is a part of a certain resolution and is also configured using pixels. To create a new zone follow the steps below:
- Press the management tab
- Select Zones on the left-hand side
- Press the Add button on the top-right
- Fill in the Name of the zone
As you might have noticed, the only thing that is required to create a zone is the name. We’ll set the actual width and height within the Channel that we are creating below.
Channel
Each channel can display any combination of one or more resolutions and zones. It’s important to understand how to configure these as they influence how content is being displayed. Let’s create a new channel and we’ll explain how it’s configured as we go:
- Press the management tab
- Select Channels & layouts on the left-hand side
- Press the Add button on the top-right
- Fill in the Name & Index of the channel
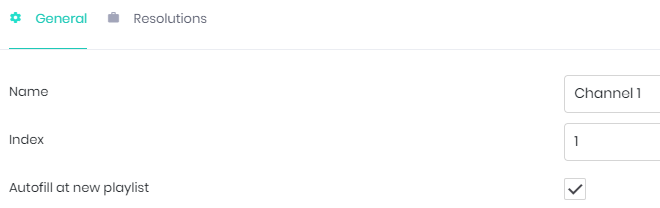
The index represents the physical channel on the device and can be set anywhere between 1 and 99. The Autofill at new playlist checkbox will decide whether this channel is used by default when creating a new playlist. Let’s take a look at the checkboxes for resolutions and zones below:

Multiple resolutions can be added within a single channel, this is because more than one device can use the same channel and therefore the same content. However, because we want to display content in the most optimal resolution for each device we are able to add several within the channel. The device will use the most optimal resolution when more than one is selected.
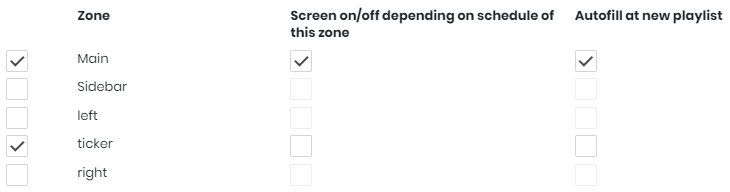
Now it’s time to decide how many zones will be used within the selected resolutions. It’s good to have a clear image of what the content should look like on the screen when configuring zones. In our example, we define two zones, the main content zone, and a ticker zone. There are two more options for each zone:
- Screen on/off depending on schedule of this zone, when this option is enabled the screen will turn on or off based on when this zone is scheduled. (E.g. when the main zone is scheduled between 08:00 and 17:00 the screen will take these times to turn on and off respectively. Even if the ticker zone plays all day long.)
- Autofill at new playlist, similar to the other autofill option whenever a new playlist is created that uses this channel, the selected zone will be used as default.
Configuring resolutions
The final step of the channel set up is to configure the resolution. This is different from creating the resolution which we’ve done earlier as this will define the actual zones. Press the Resolution tab within the channel to view the following screen:
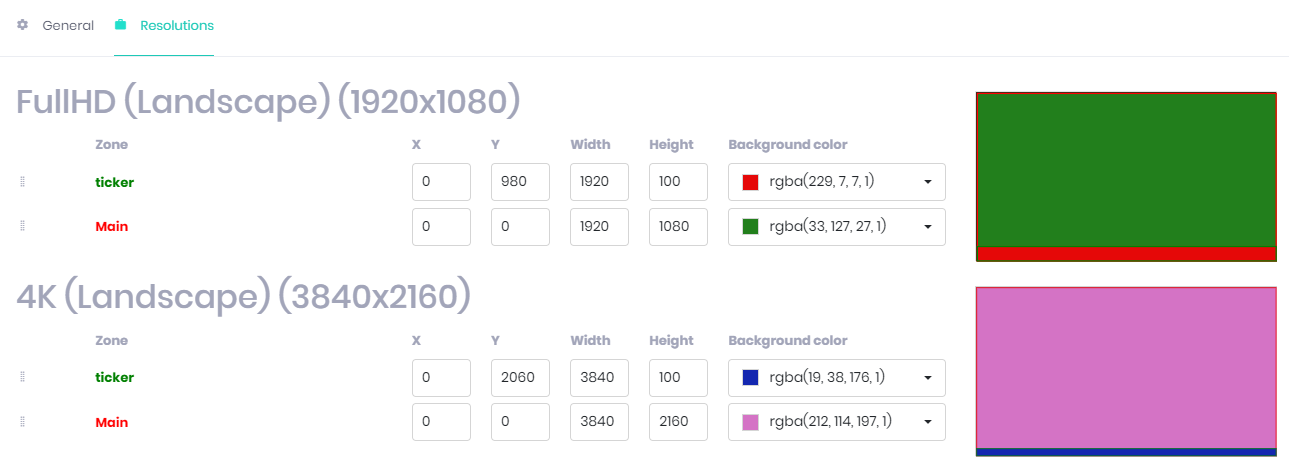
Here we are able to position and size each selected zone for every resolution that was selected as well. In laymen’s terms, we are deciding where the content for different playlists will be shown on the screen. Let’s take a look at the fields within the FullHD resolution:
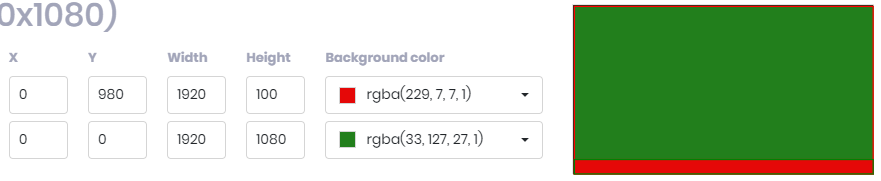
We’ll explain each field from left to right:
- X, the horizontal starting position of the zones. In this case, both fields are 0 as they will start on the left side of the screen
- Y, the vertical starting position of the zones. While the green zone starts at the top (0) the red bar will be positioned near the bottom and is therefore set to 980.
- Width, the width of the zones. Both zones cover the entire width of the screen so these are both set to 1920 pixels, the same as the resolutions’ width.
- Height, the height of the zones. The green zone is covering the entire screen so this has been set to 1080 pixels, the same as the resolutions’ height. The red zone only covers the bottom part of the screen and is set to 100 pixels.
- Background color, the default background color of the zones, it’s also being displayed on the right-hand side.
It’s good to know that the position and size should always add up to be the number of pixels from the resolution. In this case, the green zone has the same measurements configured within the width and height. The red zone has a vertical position of 980 and a height of 100 pixels which add up to 1080, the same height as the resolution.
Updating configuration
Don’t forget to update the configuration to apply changes.