Example: Multiple Screens & HDMI Switch
To illustrate more ways how control can be setup we have a few different examples below. We’ll start with the setup for the hardware and follow up with the configuration within the portal. Note that knowledge is required regarding the configuration within the GoBright portal.
Example 1a – Two TV’s and a PC
In this example, we have two different TV’s and one PC that can be connected to either TV’s HDMI port. Everything is being controlled from a single GoBright Control panel and is connected to the office network. The TV’s are connected with an RS232 cable and HDMI 1 is reserved for digital TV. HDMI 1 has been set as the default output and the TV’s will power on when the control panel is activated in the room.
Hardware Setup

The setup is quite straightforward, for two screens two IP2SL devices are needed. In this setup both TV’s are connected to the IP2SL devices using the RS232 cable. Let’s look at the configuration within the GoBright portal.
Configuration
To start log in to the GoBright portal with your manager account, and choose Settings > Control configurations. Add a new control configuration with the ‘+’ button.
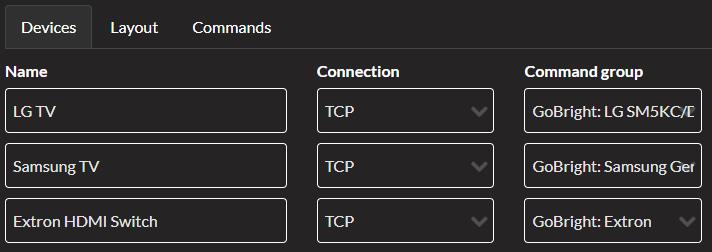
Devices
- Under devices add the two TV’s and enter the correct IP addresses, port and command group. Note that these devices use a TCP connection as they communicate via the IP2SL device.

Configuration of the two TV’s within the GoBright portal
Layout
- In the Layout tab it displays HDMI as the default input. Add another a new item within the Input group using the ‘+’ button and name this ‘TV’.
- We want to set the TV button on the left side so switch this with the HDMI button to set it on the top of the Input group.
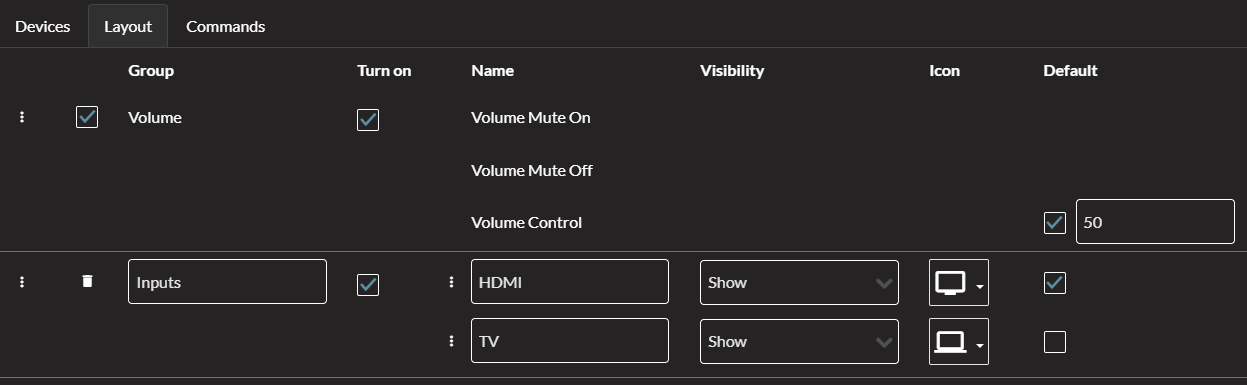
The inputs that are displayed on the Control Panel
Commands
- Add both the TV’s to all available inputs, we want them to respond to all changes that are made on the control panel.
- Add the correct command for each TV until everything has been set up correctly.

Save the configuration and Control is now ready to be used! Or read further to add an HDMI Switcher into this setup.
Example 1b – Adding an HDMI Switcher
We’ll expand our first example by adding an HDMI Switcher (Extron). The two screens will now be operated from the Extron which will receive input from the control panel.
Hardware Setup

We have added the Extron HDMI Switch that is connected with the Control Panel via TCP. The Extron is connected to the TV’s using the recommended set up. We’ll now use the Extron to Switch the HDMI channels and change the volume and power using the IP2SL devices.
Configuration
We will continue from where we left off in the first example. Log in to the GoBright portal with your manager account, and choose Settings > Control configurations. Select the existing configuration.
Devices
- Under devices add the Extron and enter the correct IP addresses, port and command group.
Layout
- The layout can stay the same as we’re using the Extron for the same purpose in this setup to switch between multiple HDMI channels.
Commands
- The Extron needs to be added to the Input group and the two TV’s can be removed. For all other commands, we can keep the settings from the first example.
- Add the Extron using the drop-down menu and select Input 1 and Input 2 as commands.

Save the configuration and Control is now ready to be used!