Google Workspace (formerly G Suite) integration
The following configuration of Google Workspace (formerly G Suite) is needed to let GoBright communicate with the calendars in Google Workspace.
We assume you have the following already in your possession:
- Administrator access to the Google Workspace environment
The configuration manual goes through the following steps:
- Create a service account in Google Workspace
- Enable API access in Google Workspace
- Create the room calendars in Google Workspace
- Configure the room calendars in Google Workspace / Google Calendar
Create a service account in Google Workspace
To set up the Google Workspace integration a ‘service account’ is needed, for example [email protected] .
This service account is needed for synchronization and will be used for managing the reservations in the calendars and for anonymous bookings. The service account is a regular account, but should not be a personal account, but a dedicated account just for the connectivity with GoBright.
Follow these steps to create a service account:
- Go to the Google Workspace admin console: https://admin.google.com
- Log in with your company Google Workspace administrator account
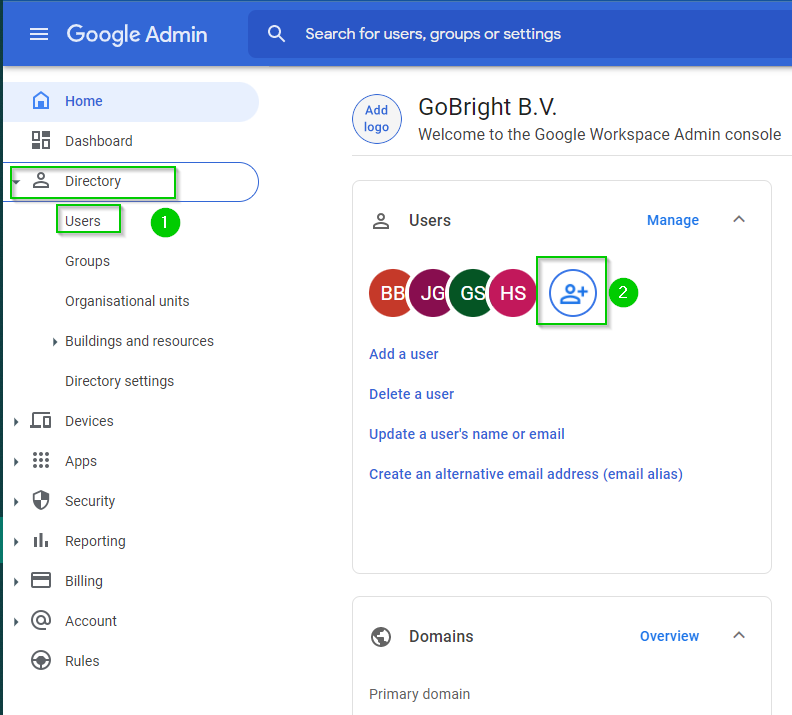
- There are two ways to add a new users:
- On the left you can open the ‘Directory’ > ‘Users’ > ‘Add new user’
- On your home screen you can add a new user by clicking on the ‘Add user’-button
- Fill the service account details, e.g.:
- First name: GoBright
- Last name: Booking
- Primary email address: gobright
- Click ‘Manage user’s password, organisational unit and profile photo’. Set a permanent password by unticking ‘Ask user to change their password when they sign in’. *Please note: you will need the password later on.
- Select ‘Add new user’
Enable API access in Google Workspace
GoBright communicates with Google Workspace via the Google API’s. Therefore you need to enable ‘API access’ in your Google Workspace admin.
Follow these steps to enable API access:
- Go to the Google Workspace admin console: https://admin.google.com
- Log in with your company Google Workspace administrator account
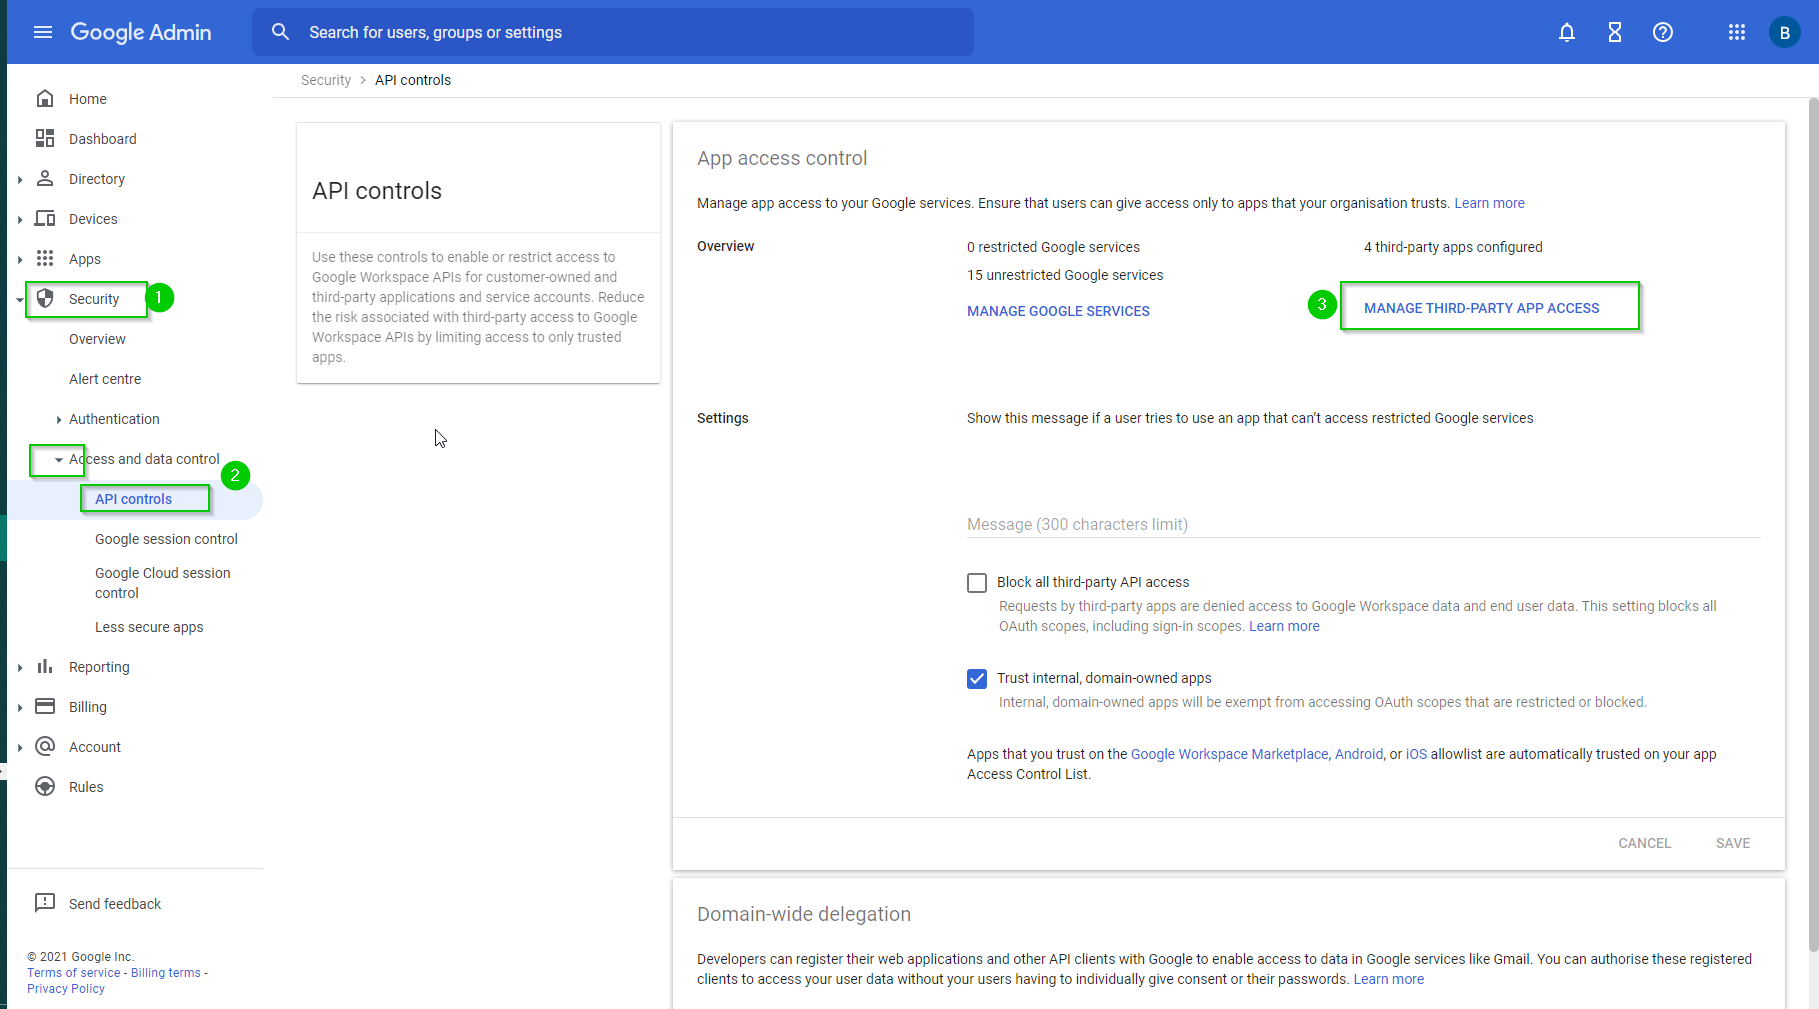
- Open ‘Security’ on the left navigation bar (1)
- Choose ‘Access and data control (2)
- Open API controls (2)
- Then open ‘Manage third-party app access’
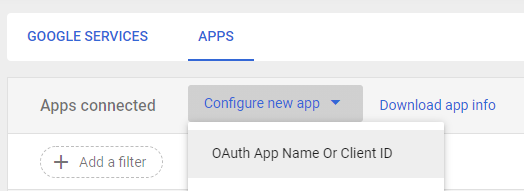
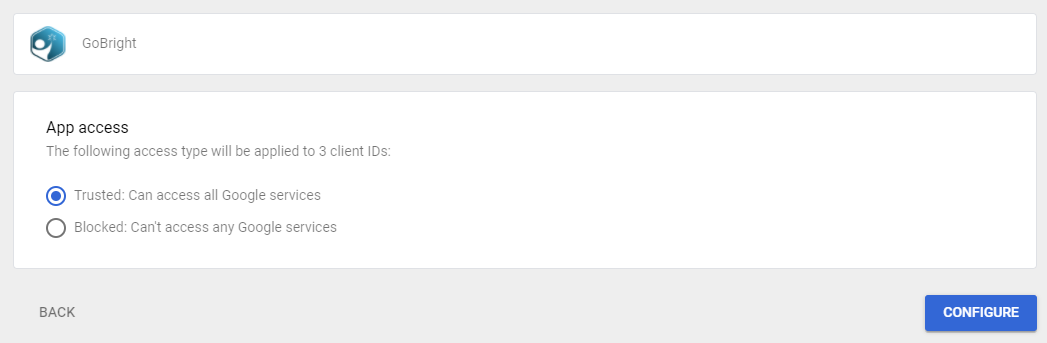
- Configure a new app and select Oauth App Name or Client ID
- Search for ‘GoBright’ and select our logo when it pops up
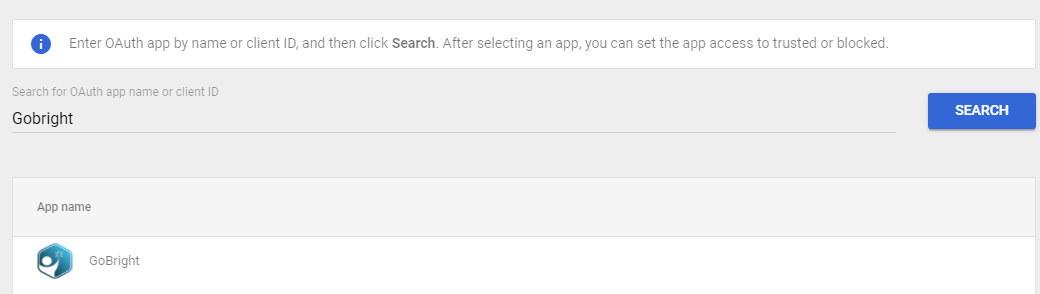
- Select all check-boxes press next, select Trusted and finally press ‘Configure’
Create room calendars in Google Workspace
The room calendars, or ‘calendar resource’ in Google Workspace terms, are special types of calendars meant for shared resources like rooms.
If you’ve already created the room calendars, then you can proceed to the next step.
Follow these steps to go to the resource management in Google Workspace:
- Go to the Google Workspace admin console: https://admin.google.com
- Log in with your company Google Workspace administrator account
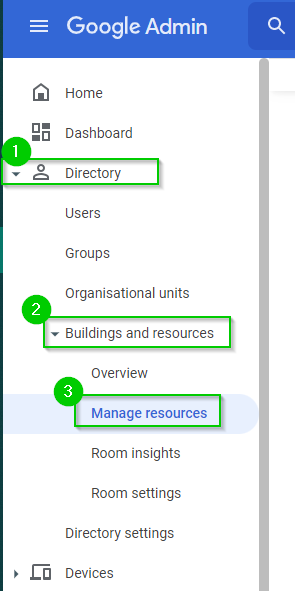
- On the left navigation bar open the ‘Directory’
- Click on ‘Buildings and resources’
- Then open ‘Manage resources’
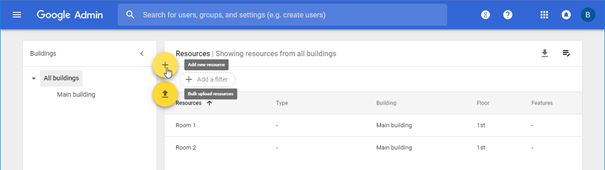
- Here you can add your rooms as new resources. Choose ‘add new resource’:
- Fill the details of the room:
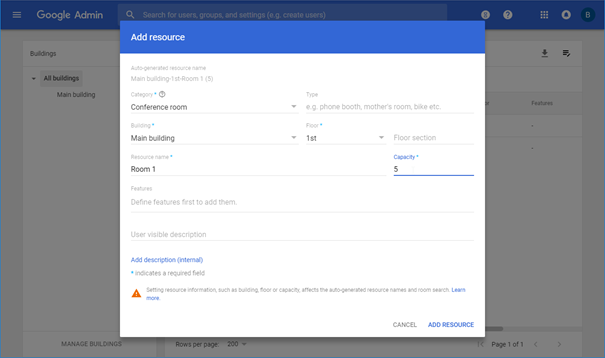
- Click ‘Add resource’
Configure the room calendars in Google Workspace / Calendar
The room calendars need to be configured correctly, otherwise GoBright might not have proper access, and will not be able to execute all the actions, like for example insert a reservation or stop a reservation.
In the following steps you will give the service account access to the calendar, and configure the calendar to automatically accept meetings.
Please also execute these steps for already existing room calendars!
Follow these steps to go to the calendars in Google Workspace / Calendar:
- Go to Google Calendar via https://calendar.google.com
- Log in with your company Google Workspace administrator account
- Please check you’re really logged in with your company Google Workspace administrator account in to top right corner, where you can see the active user.
Then follow these steps for each room calendar you want to link to GoBright:
- First you need to add the room calendar to ‘my calendars’, otherwise you cannot configure the settings of the calendar.
Choose the ‘+’ icon left from the calendar view, then choose ‘Browse resources’ and choose the room calendar(s):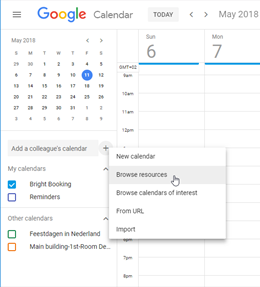

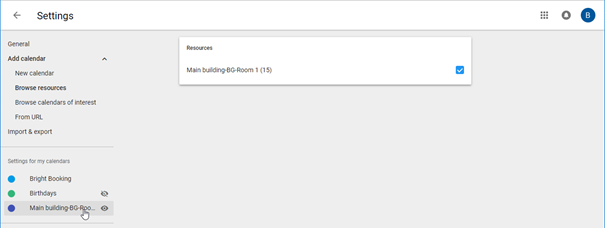
- Then choose the room calendar on the left, to go to its settings:
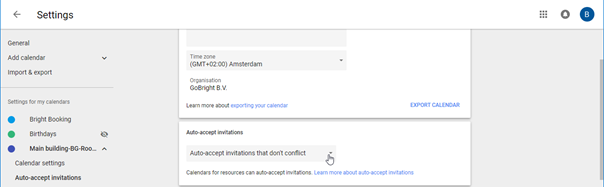
- Go to ‘Auto-accept invitations’ set this to: ‘Auto-accept invitations that don’t conflict’:
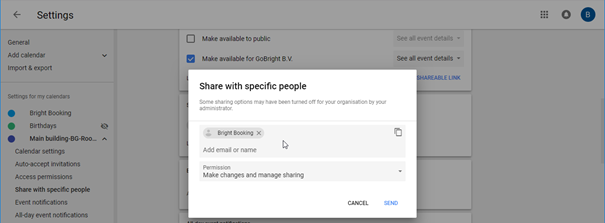
- Share the calendar with the service account:
- Go to ‘Share with specific people’
- Click ‘Add people’

- Choose your service account (e.g. [email protected]) and set the permission to ‘Make changes and manage sharing’.
- Repeat these steps for all your room calendars.
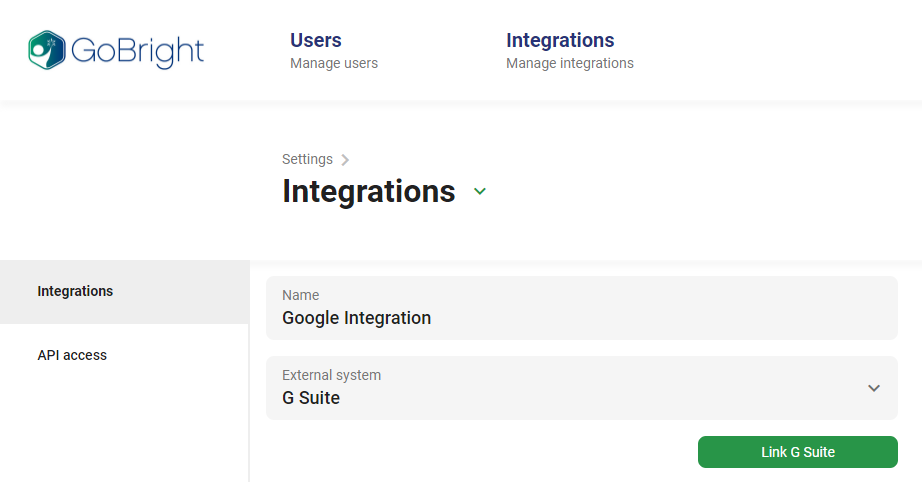
Set up Google integration in GoBright portal
- Log in to the GoBright portal with your manager account, and go to the Admin center > Integrations.
- Create a new integration and press the Link with G Suite button
- Log in with the Service account that has been created
- Grant the permissions to GoBright and press confirm
- When done correctly it will display a green text that states that the service account has been successfully linked and authenticated
- Press Save to finish the integration
Now that the integration has been finished it’s time to add the rooms
Add your users into the GoBright portal
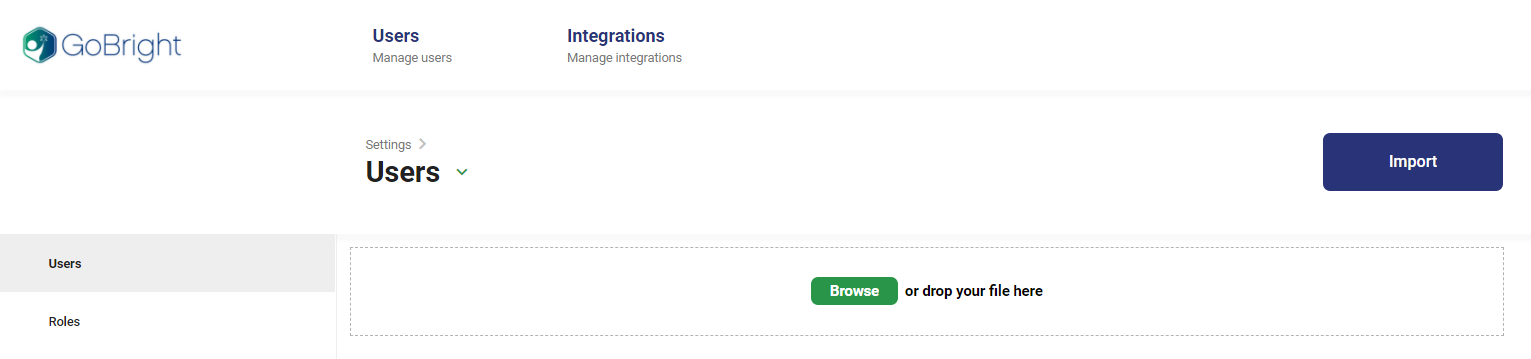
You will need to add your users into the GoBright portal. This can be done manually or via a CSV file.
Add or edit users manually within the system
Log in to the GoBright portal with your manager account, and choose Settings > Users.
Now add a user with the ‘+’ button, or select an existing one to edit.
User configuration
Each user can be enabled/disabled and has a name to be shown in GoBright.
The email address is used as a username to log in.
Optionally the mobile phone number is used to send SMS notifications, which is optional in the digital reception module.
Optionally the user can be integrated, which means the integration will be used to authenticate.
If the user is not an integrated user, then a password should be set.
Optionally the pincode can be configured if the users do not manage their own pincode.
The ‘users manage their own pincode’ setting defines how many details are visible, please refer to the general settings.
Optionally the NFC Identification can be configured. Therefore NFC support should be enabled in the general settings. This will enable the NFC options, and enable the NFC Identification field when editing a user. The NFC Identification should contain the unique ID of the NFC card, in HEX format: XX:XX:XX:XX:XX:XX:XX .
Import users using a CSV file
It’s possible to import a list of users by creating a *.csv file and uploading it to the GoBright portal. Within Admin Center > Users press the Browse button. Select the *.csv file to import and press the ‘Import’-button.
Prepare the *.csv file using the template provided here.
The following information can also be imported:
EmailAddress
Name
TelephoneMobile
Pincode
AuthenticationUsername
Active
UniqueImportID
DefaultCostCenterIdOrName
NFCId
Note that the file needs to be saved in CSV format if Excel is used to import the file instead of opening it.