LG webOS - Installation Guide
Before a device can be activated the GoBright app must be installed. This guide will cover everything that needs to be configured within an LG webOS display to prepare it for GoBright View. Each step covers a screenshot and explanation on how to get there and what to do.
Please refer to this list of hardware that is certified in combination with GoBright View.
Use this guide as a reference. Certain settings may look different or may not be available on your device.
WebOS resolution/aspect ratio support
LG webOS only supports 16:9 aspect ratios (portrait and landscape). This means that the e.g. WP400/WP401/WP402 box does not support other aspect ratios than 16:9 (landscape 1920*1080 or portrait (1080*1920)).
WebOS app are always rendered in Full HD (1920*1080 or 1080*1920), even when the output resolution of the webOS device is set to 4K.
To use GoBright View with other resolutions or aspect ratios a certified Windows device must be used.
Firmware update
Before configuring settings and installing the GoBright View app please make sure the device is running the latest firmware.
The firmware can be updated using a USB drive or from the GoBright Portal as the webOS device is webOS3.2 or up and the installed GoBright View app is version 4.92 or up. For more information about updating the firmware from the GoBright Portal, please read: Device settings and status
Firmware downloads
| webOS Version | Device Model | Firmware Version |
|---|---|---|
| webOS 3.0 | XS4F, XS2E, XF3E | Firmware version: v5.37.10 Note: webOS 3.0/3.2 support is currently in beta |
| webOS 3.0 | SM5(K)C, LS75C, UH5C | Firmware version: v4.75.60 Note: webOS 3.0/3.2 support is currently in beta |
| webOS 3.2 | SM5KD | Firmware version: v04.06.40 Note: webOS 3.0/3.2 support is currently in beta |
| webOS 4.0 | SM5KE, SH7E, UH5E, UH5F, UM3E, HP5E, WP400, WP401, WP402 | Firmware version: v04.11.00 |
| webOS 4.1 | SM3G, UM3(D)F, UH5F, UH7F, UL3G | Firmware version: v03.23.50 |
| webOS 6.0 | SM5J, UL3J | Firmware version: v03.08.80 |
| webOS 6.0 | UH5J, UH7J | Firmware version: v03.24.00 |
Update the firmware using a USB drive
Note: when updating using a USB drive, use a USB drive with 16GB or less.
USB drives with a larger capacity may not be recognized by the webOS device and thus won’t work.
- Download the firmware
- Format the USB drive to FAT32
- Create a folder named LG_MONITOR in the root of the USB drive
- Place the .epk file inside the LG_MONITOR folder
- Put the USB drive in the webOS device
- The device should prompt an update firmware message, press OK to continue
- When the update is complete, remove the USB drive and reboot the device
Update the firmware from the GoBright Portal (when the View app is already installed)
Please see: Device settings and status
If your device is currently on a 06.xx firmware
The 06.xx.xx range firmware was a special release by LG and now is replaced by the official 03.xx.xx firmware.
To install a 03.xx.xx firmware on a device currently running a 06.xx.xx firmware follow the steps below.
- Download the firmware
- Format the USB drive to FAT32
- Create a folder named LG_MONITOR in the root of the USB drive
- Place the .epk file inside the LG_MONITOR folder
- Put the USB drive in the webOS device
Now the firmware update screen will open with a message “the current firmware is newer”, preventing the firmware update. - Close this screen by pressing the back button on the remote
- Go to Settings > General
- Press the 7 button on seven times
- The firmware update screen will open again, but this time updating is possible
The firmware file should already be selected, if not, select the firmware file - Enable Ext. MICOM
- Click Update
- When the update is complete, remove the USB drive and reboot the device
Configuring webOS settings
webOS 3.2 (beta), webOS 4.0, webOS 4.1 and webOS 6.0
The first things that we’ll address are the general settings of the screen. This includes the time zone, energy-saving settings, and network configuration. All of this is configured within the General Settings by pressing the settings button on the remote.
Time & Date
GoBright requires the time and date to be configured in order to display the content. It is essential that this is configured accordingly for your specific timezone. Go to the General Settings and then Time & Date.
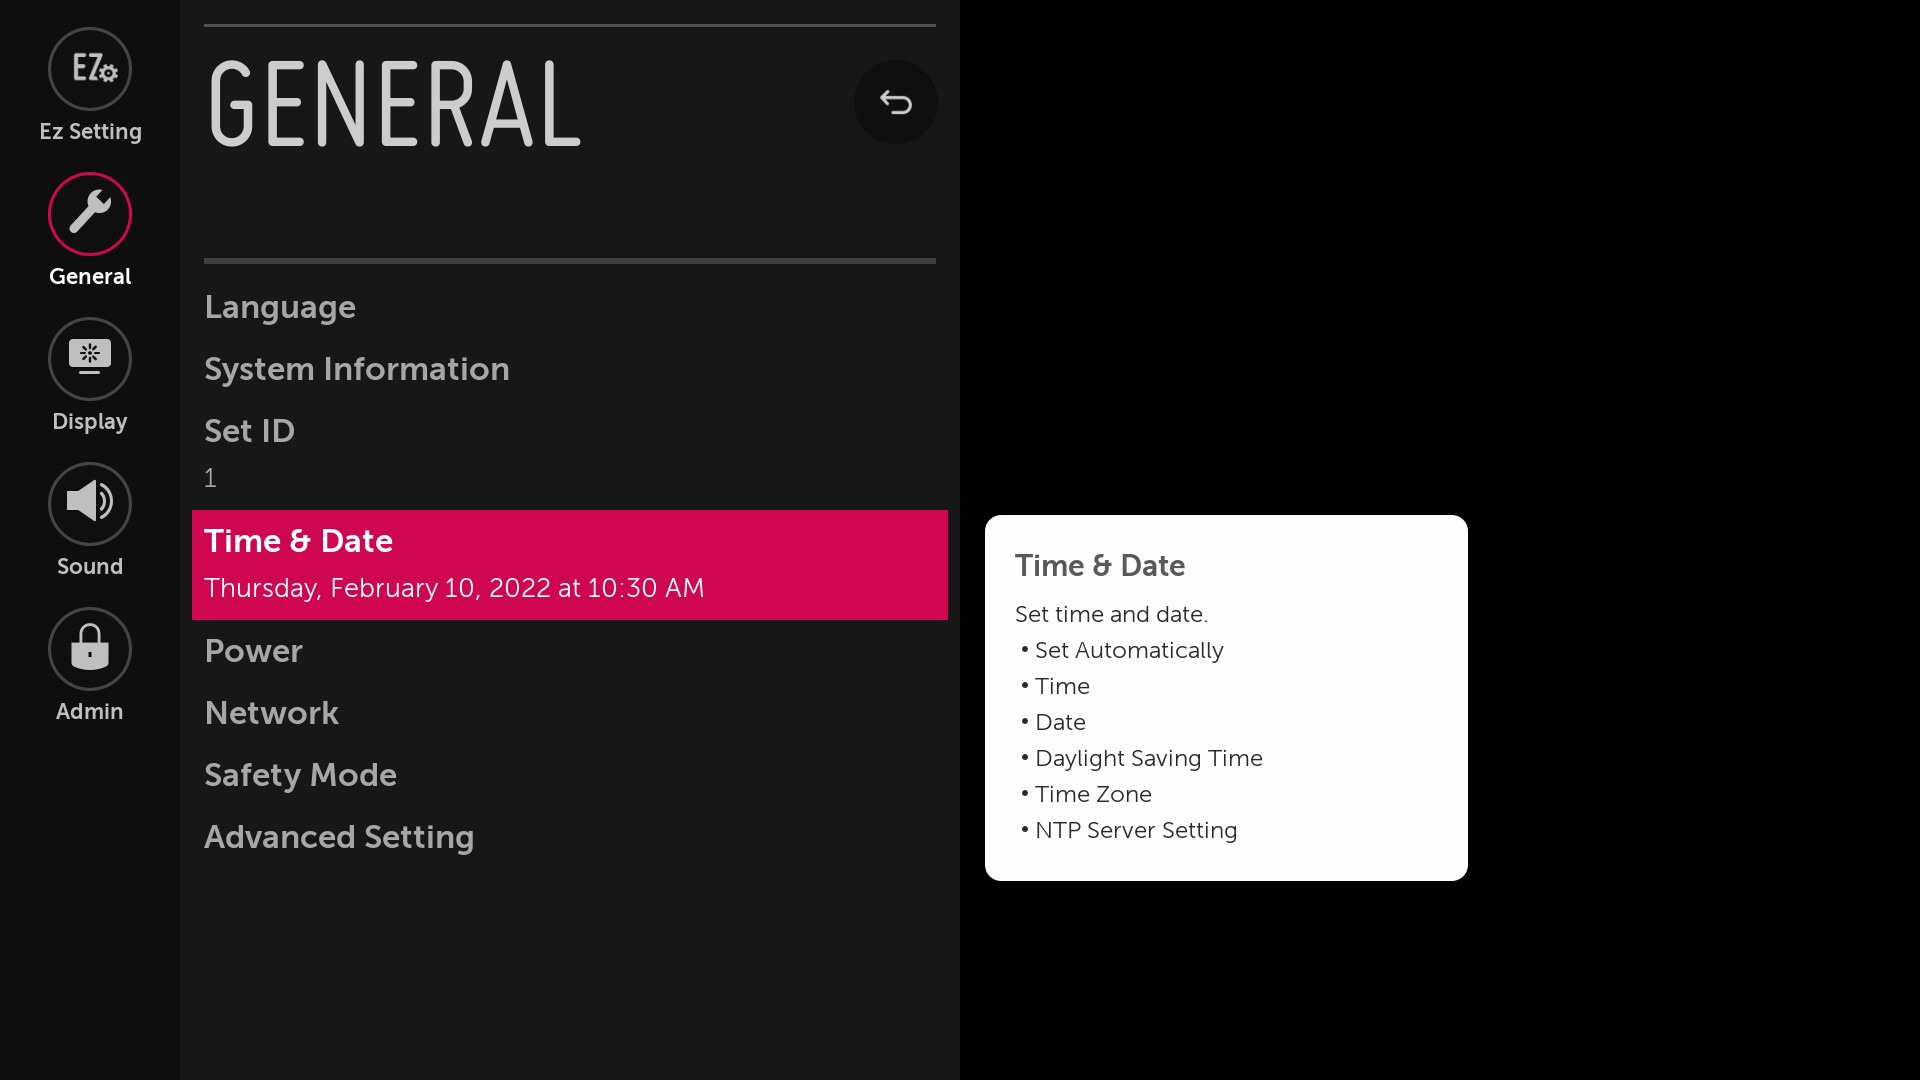
Make sure that Set Automatically is enabled
Navigate to Time Zone and press OK
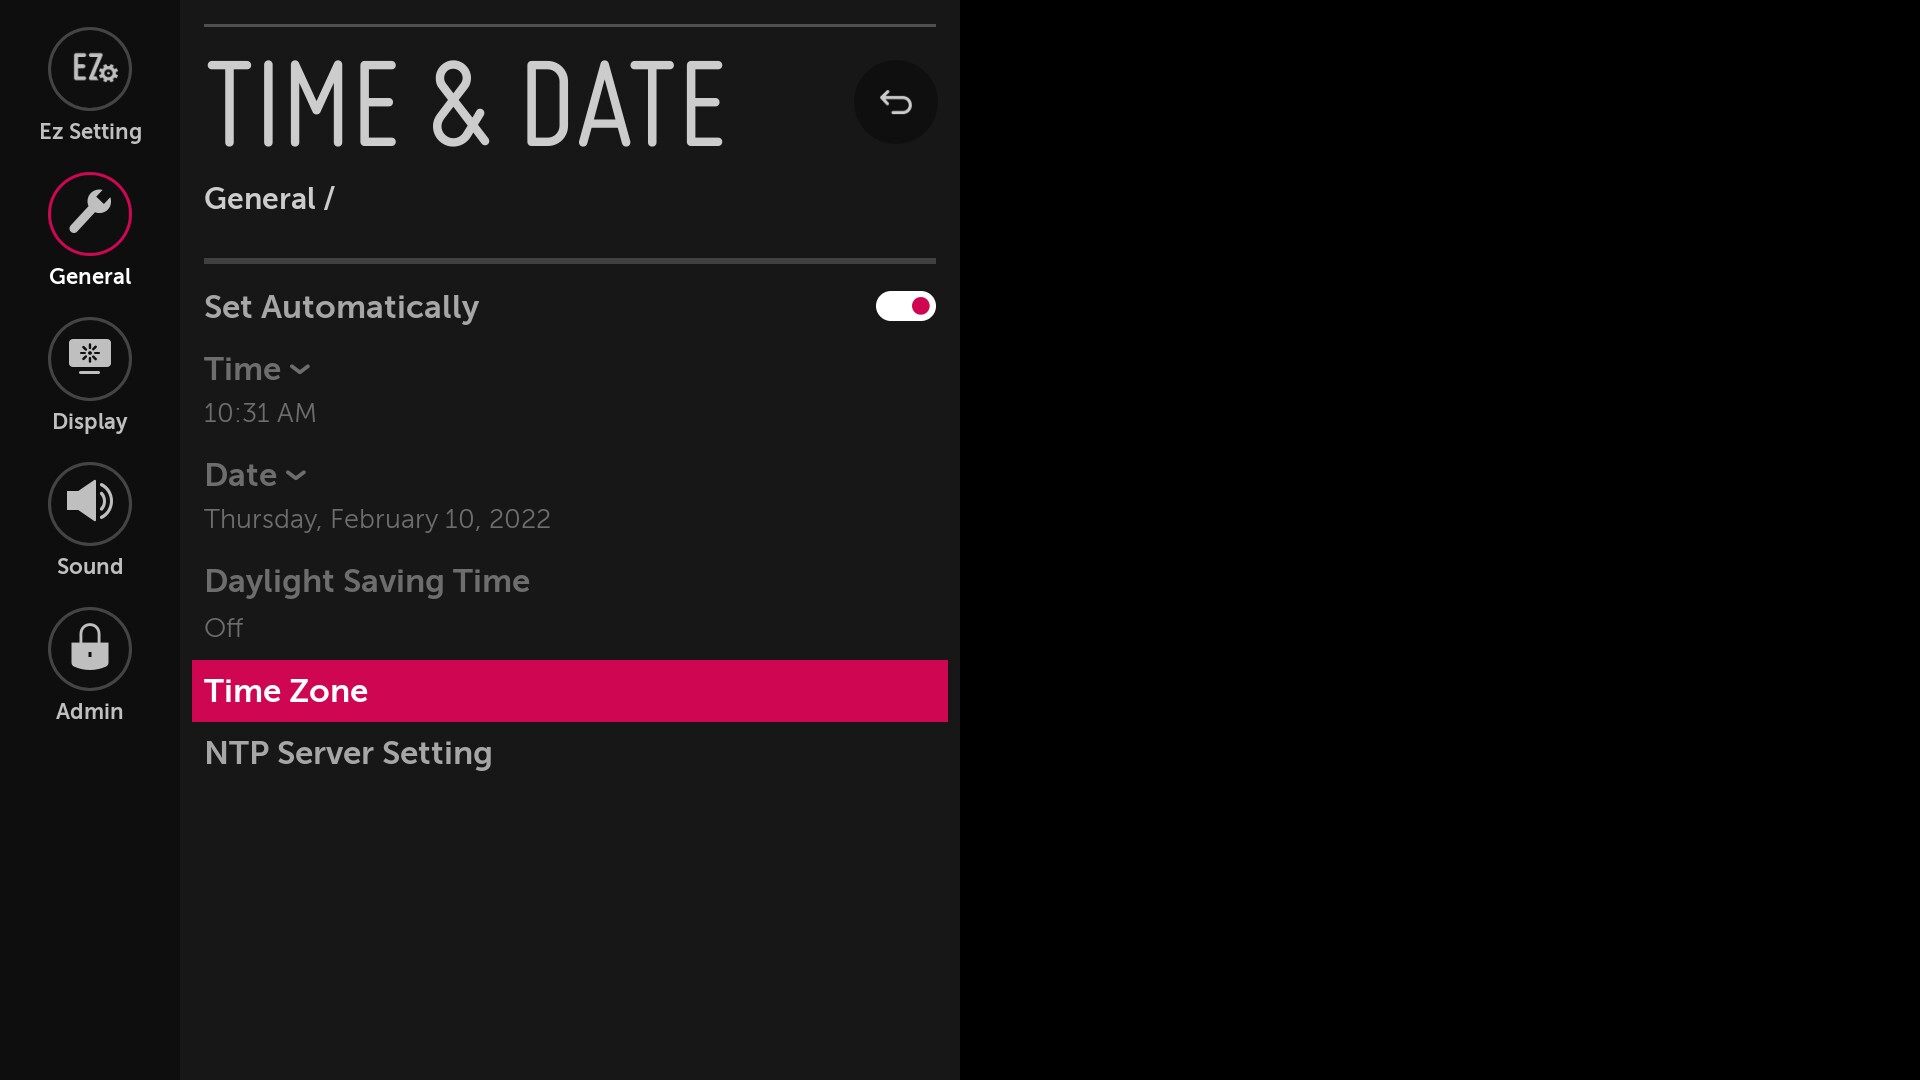
Make sure the settings match your location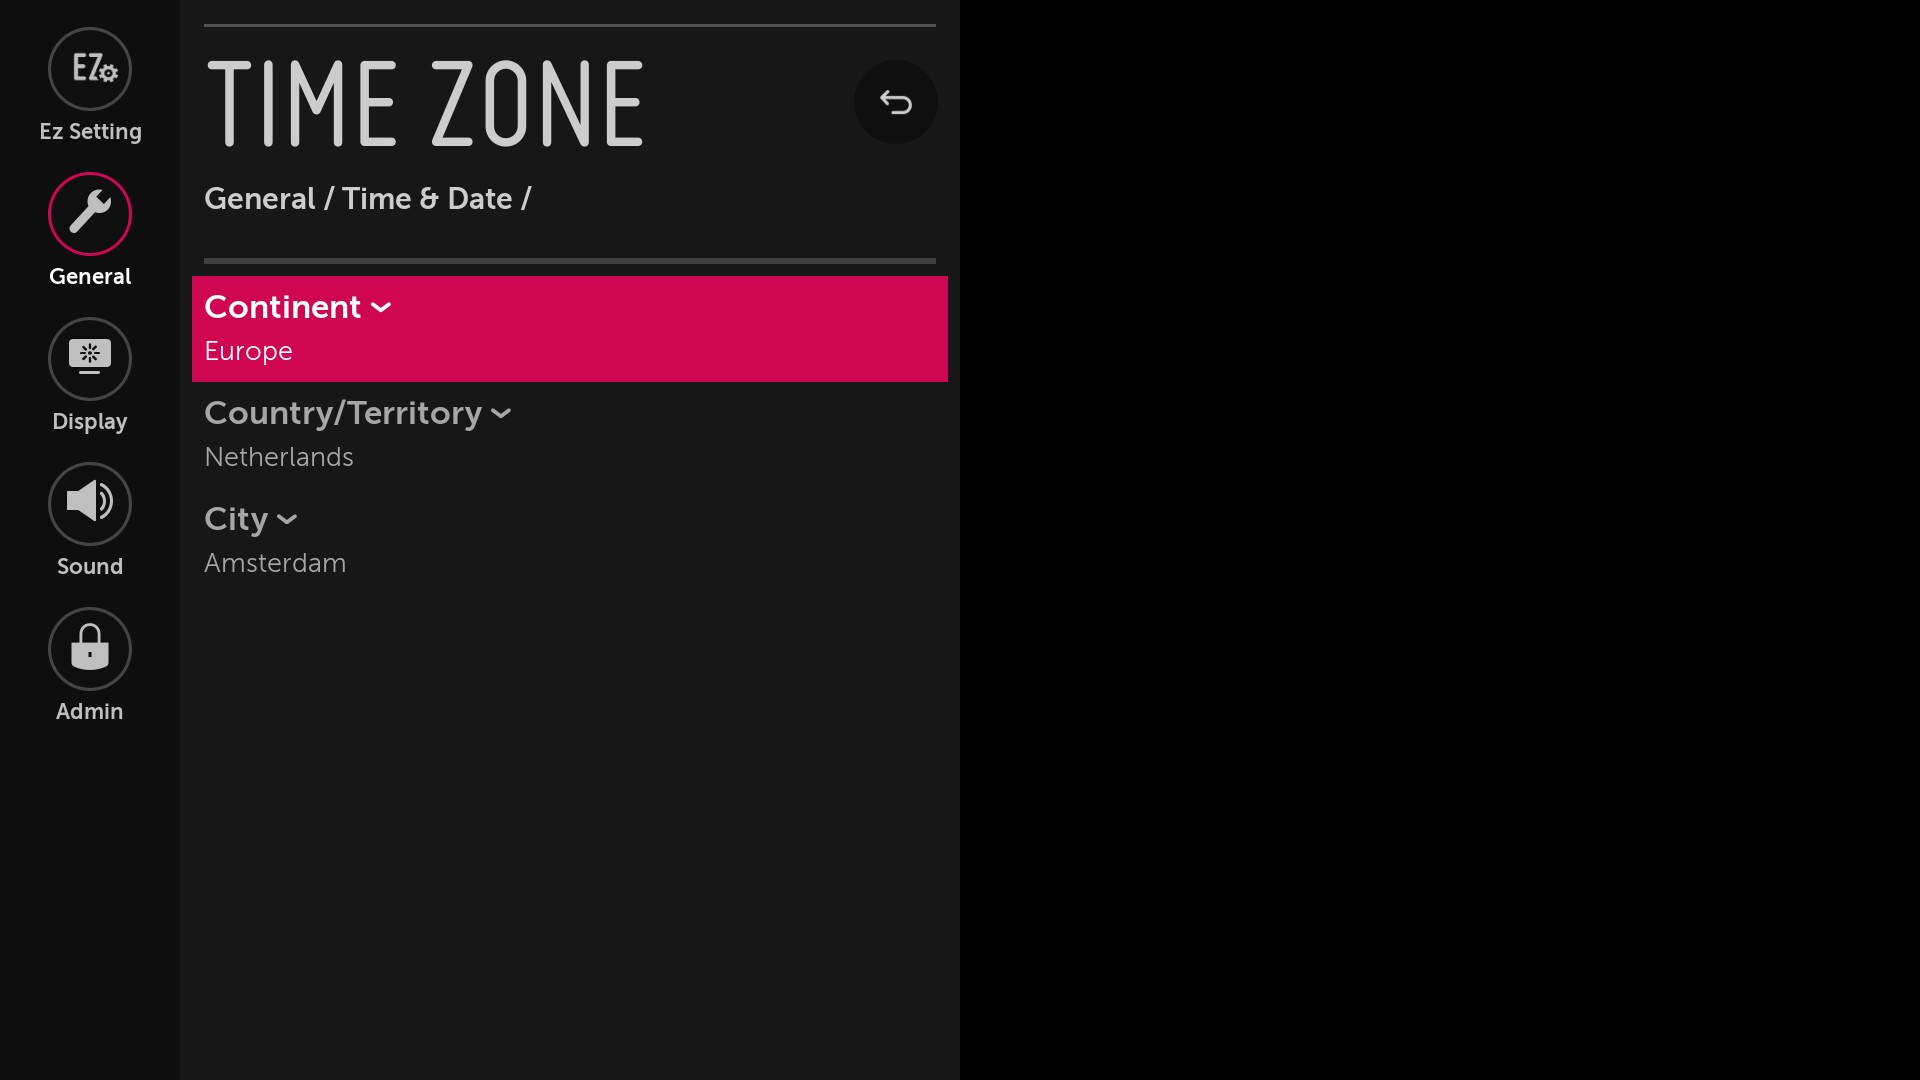 location of the screen. (e.g. these settings are configured based on the time zone in Amsterdam – GMT +01:00)
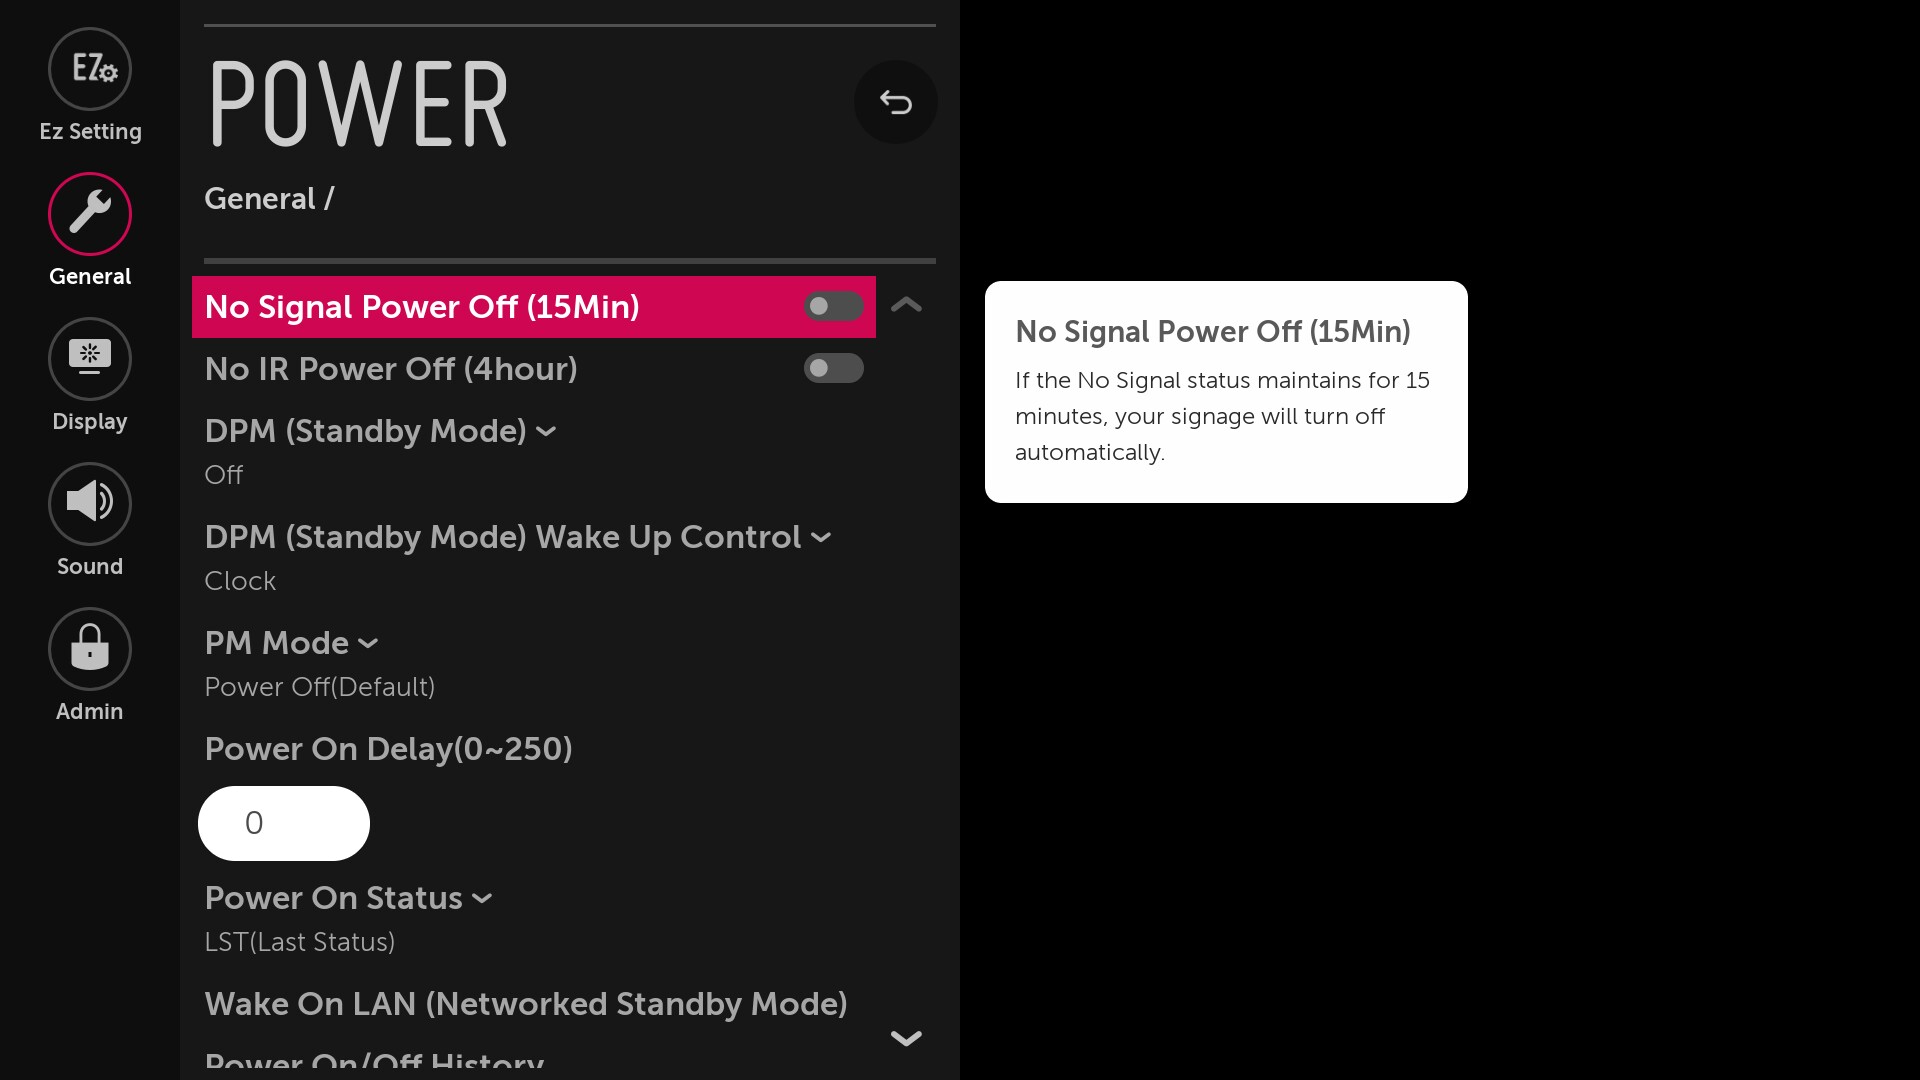
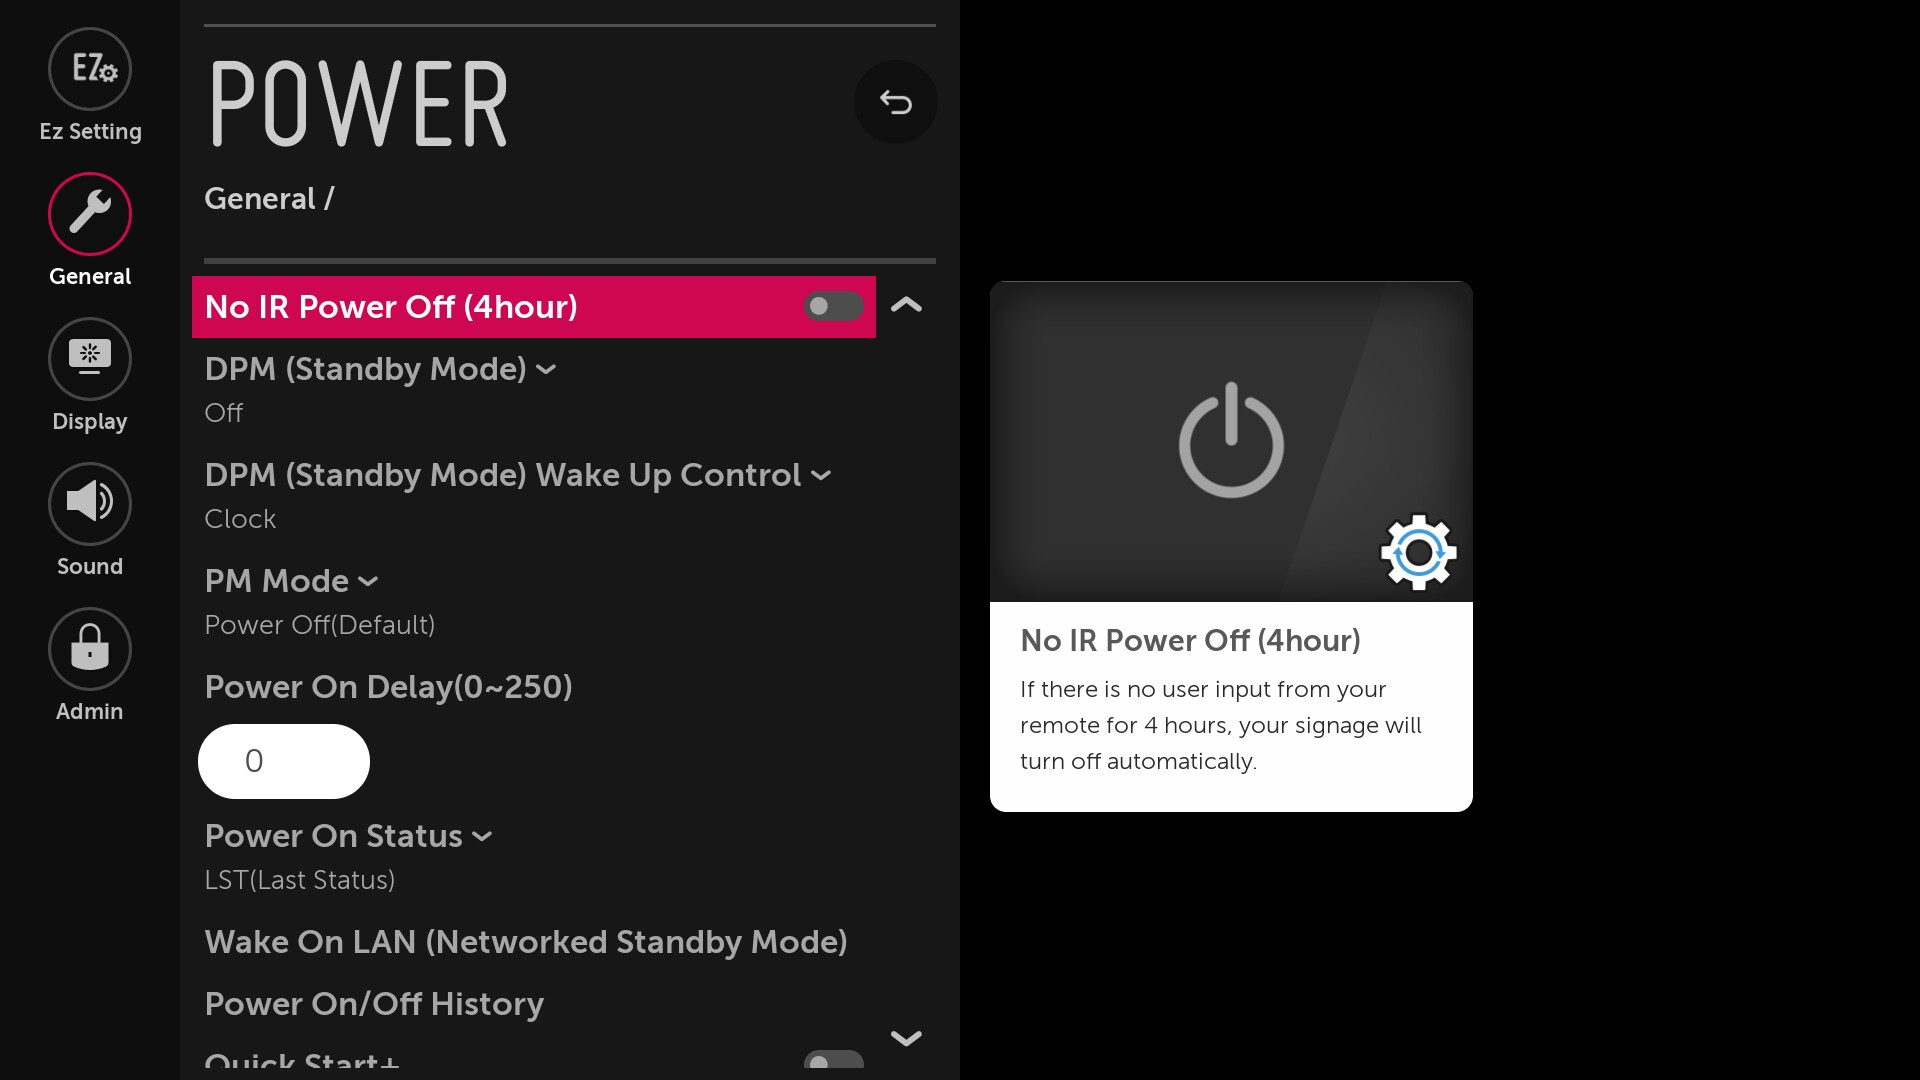
Energy-saving settings
By default, the screen has a few energy-saving settings that might cause the screen to turn off unexpectedly. GoBright View will turn the screen off based on the schedule so there is no need to enable these settings. To turn disable them go to the General Settings and then Power.
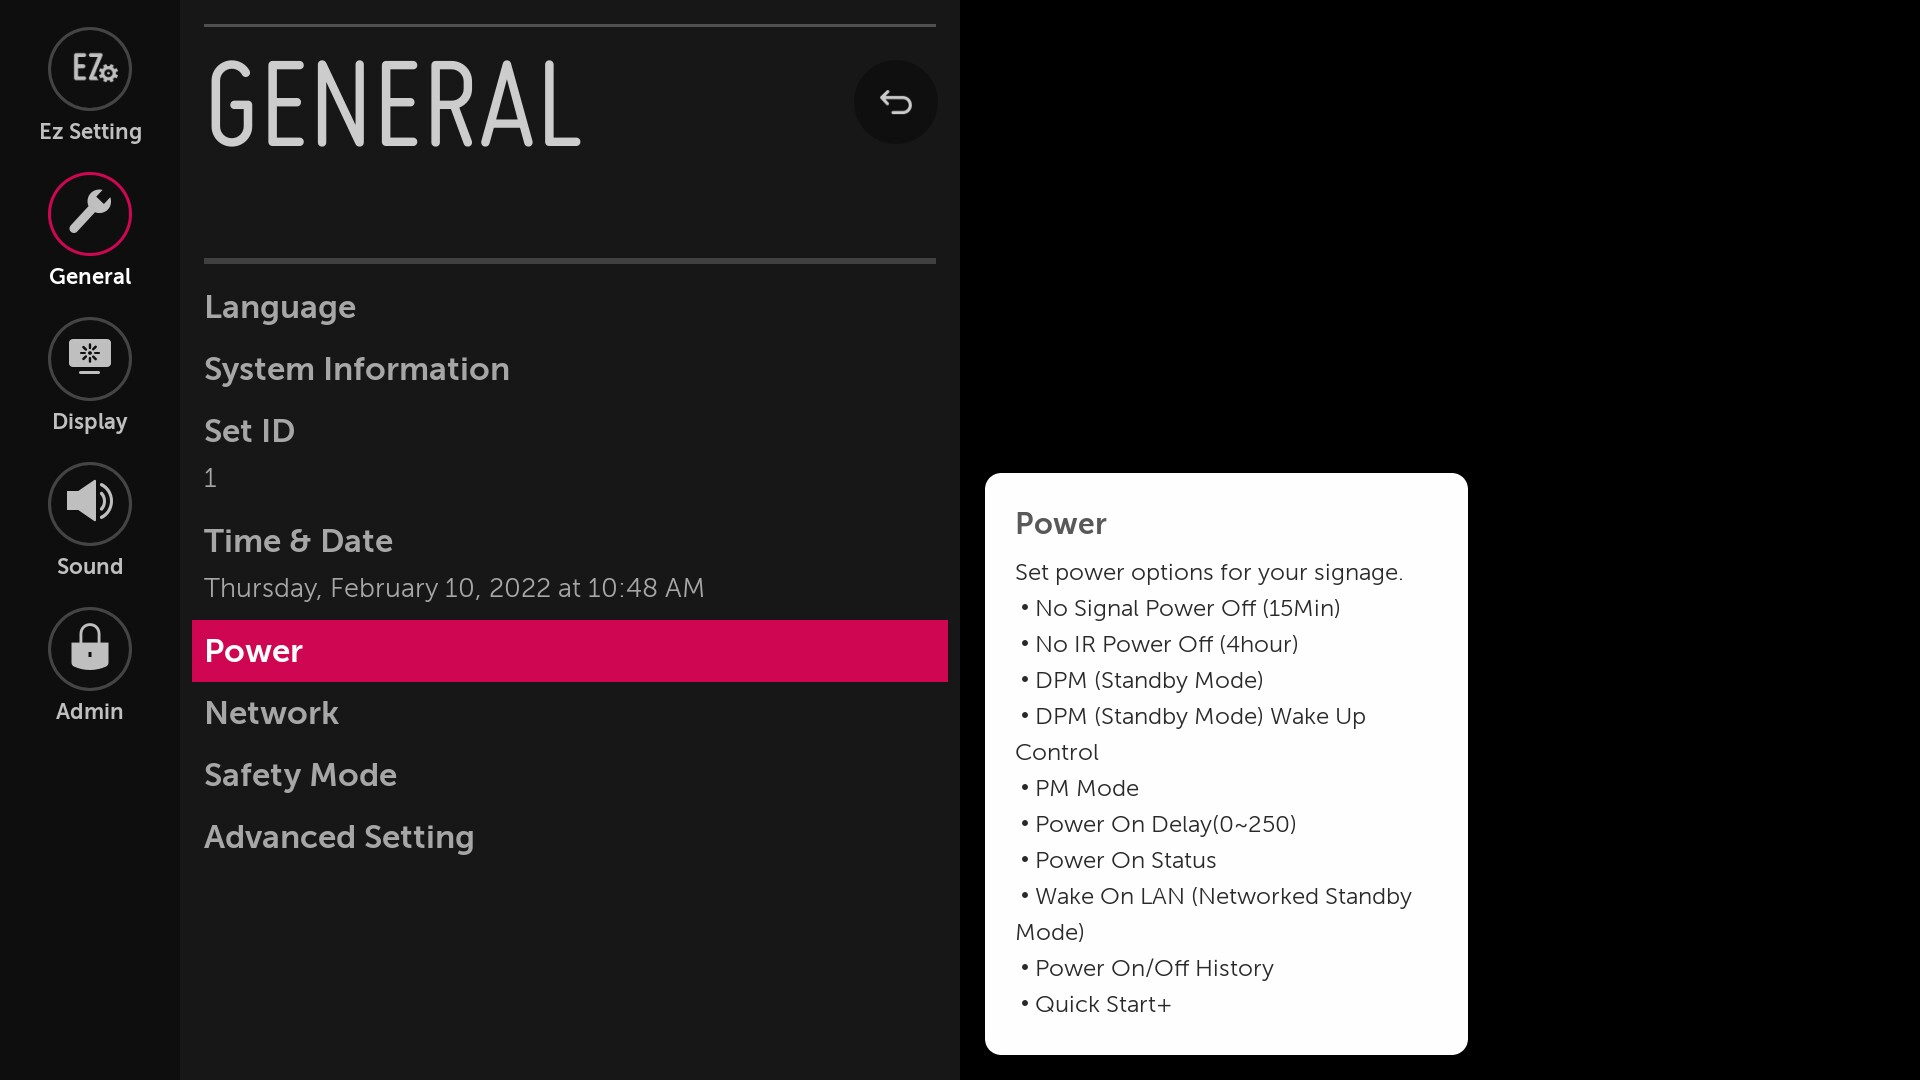
Make sure to disable the No signal Power Off (15Min) setting
Make sure to disable the No IR Power Off (4hour) setting
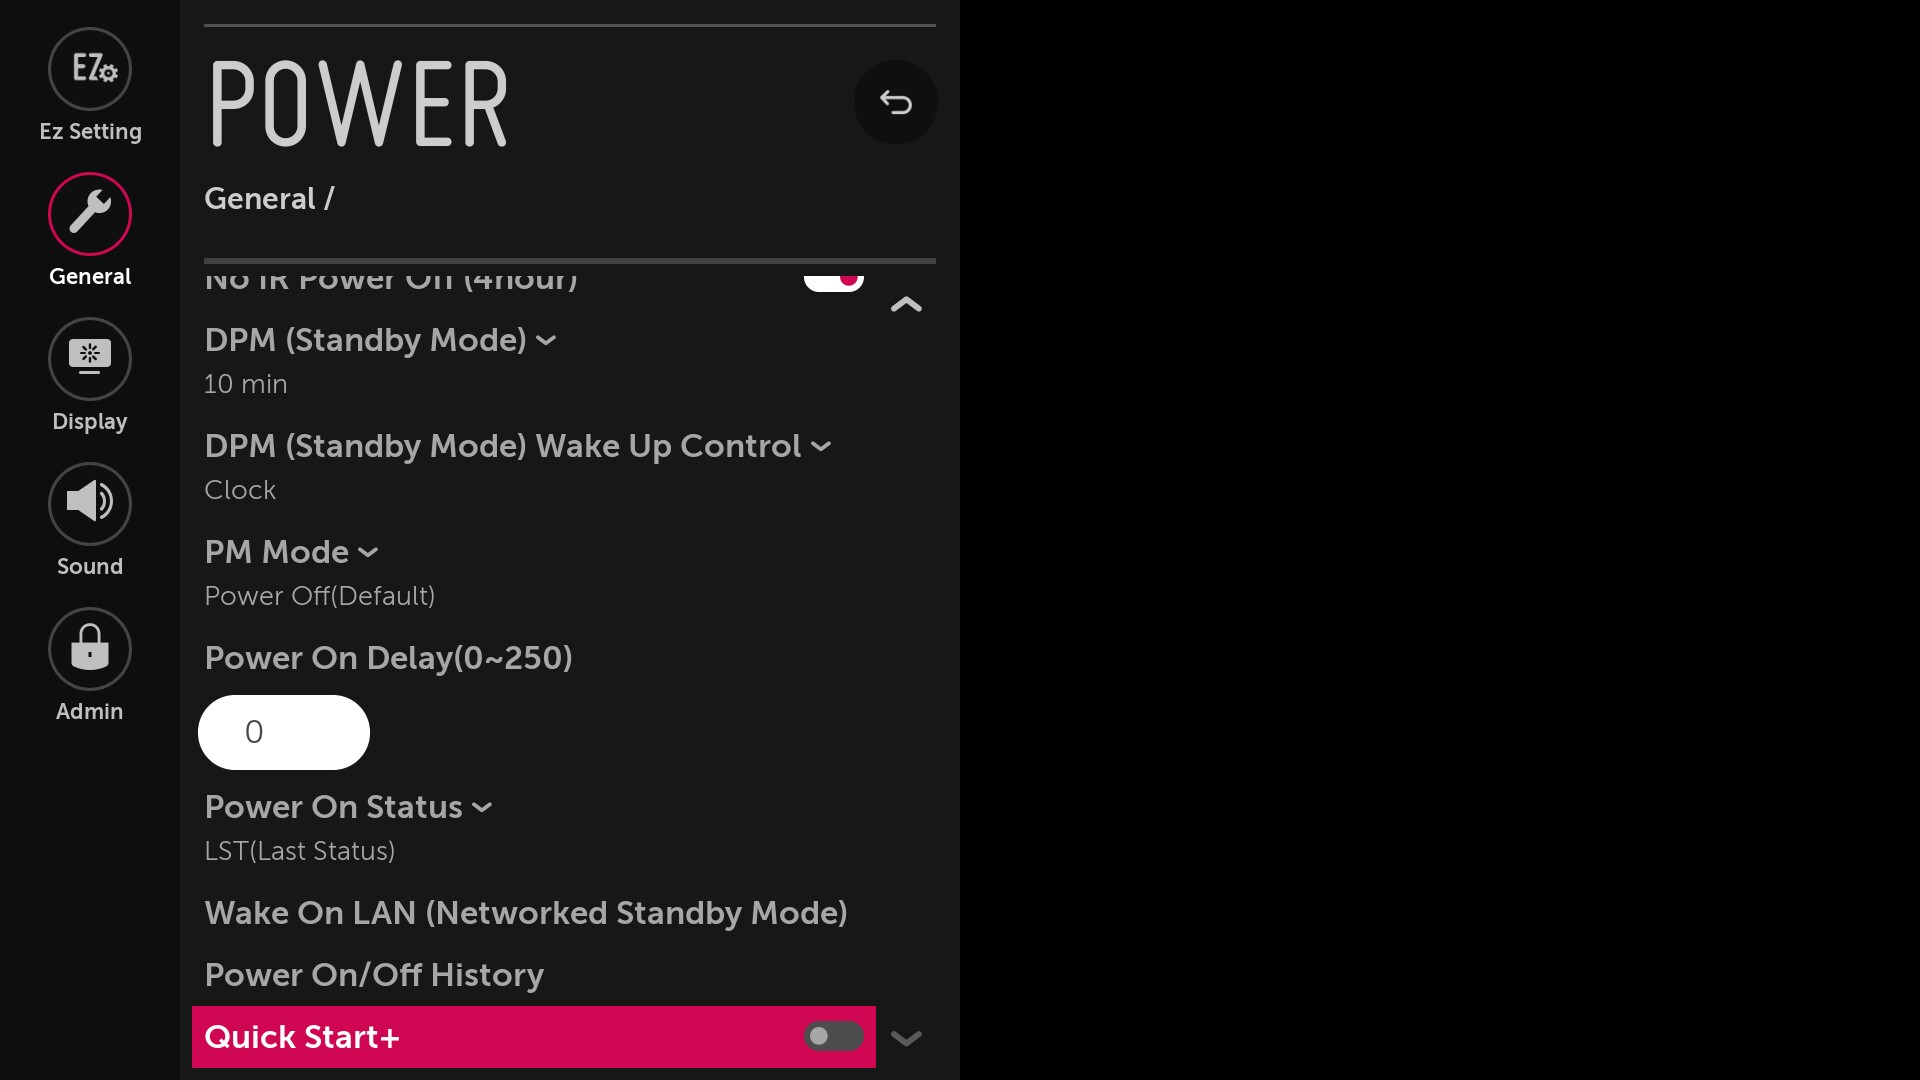
Set DPM Mode to Off
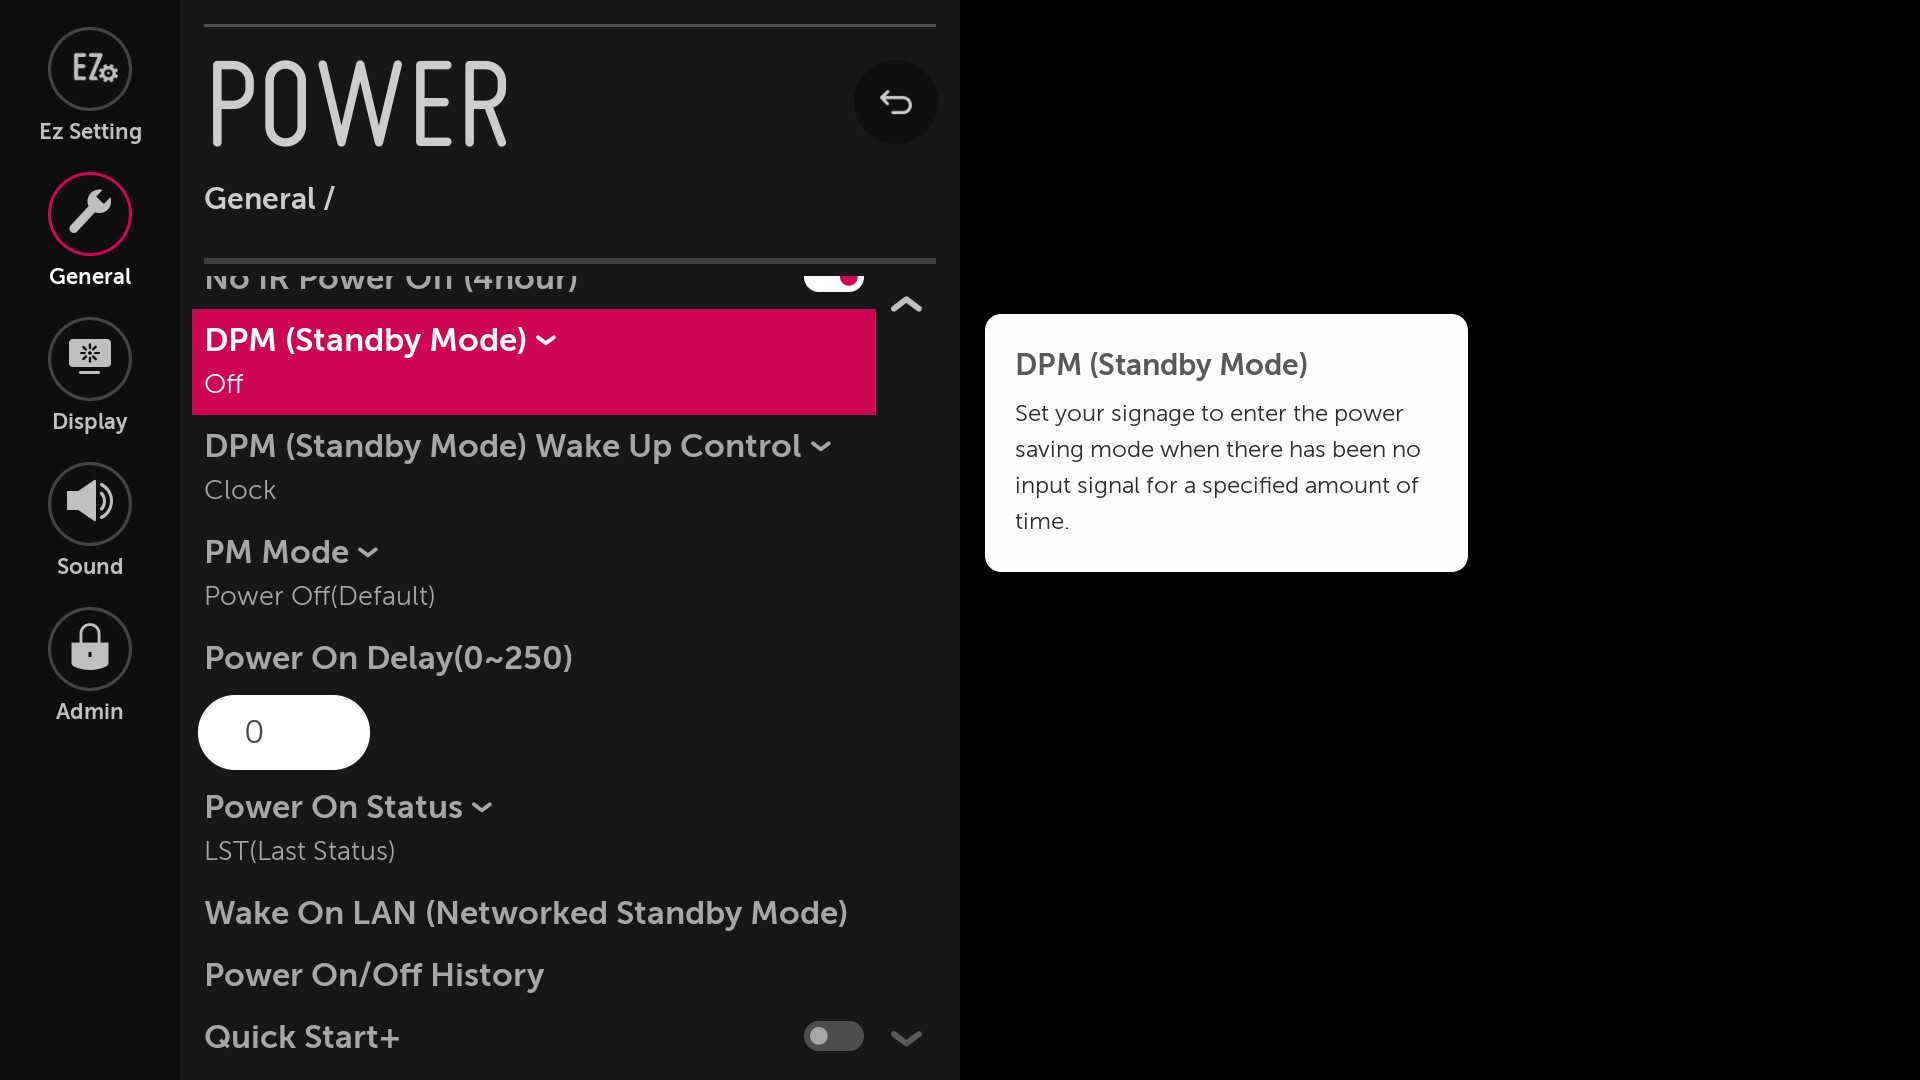
Set Power On Status to what you prefer. When this is set to PWR the device will turn on after power loss.

Additionally for only webOS 6.0: set Quick Start+ to Off
When using HDBaseT
Enable the WOL (Wake on Lan) options. Otherwise RS232 over HDBaseT cannot switch on the device.
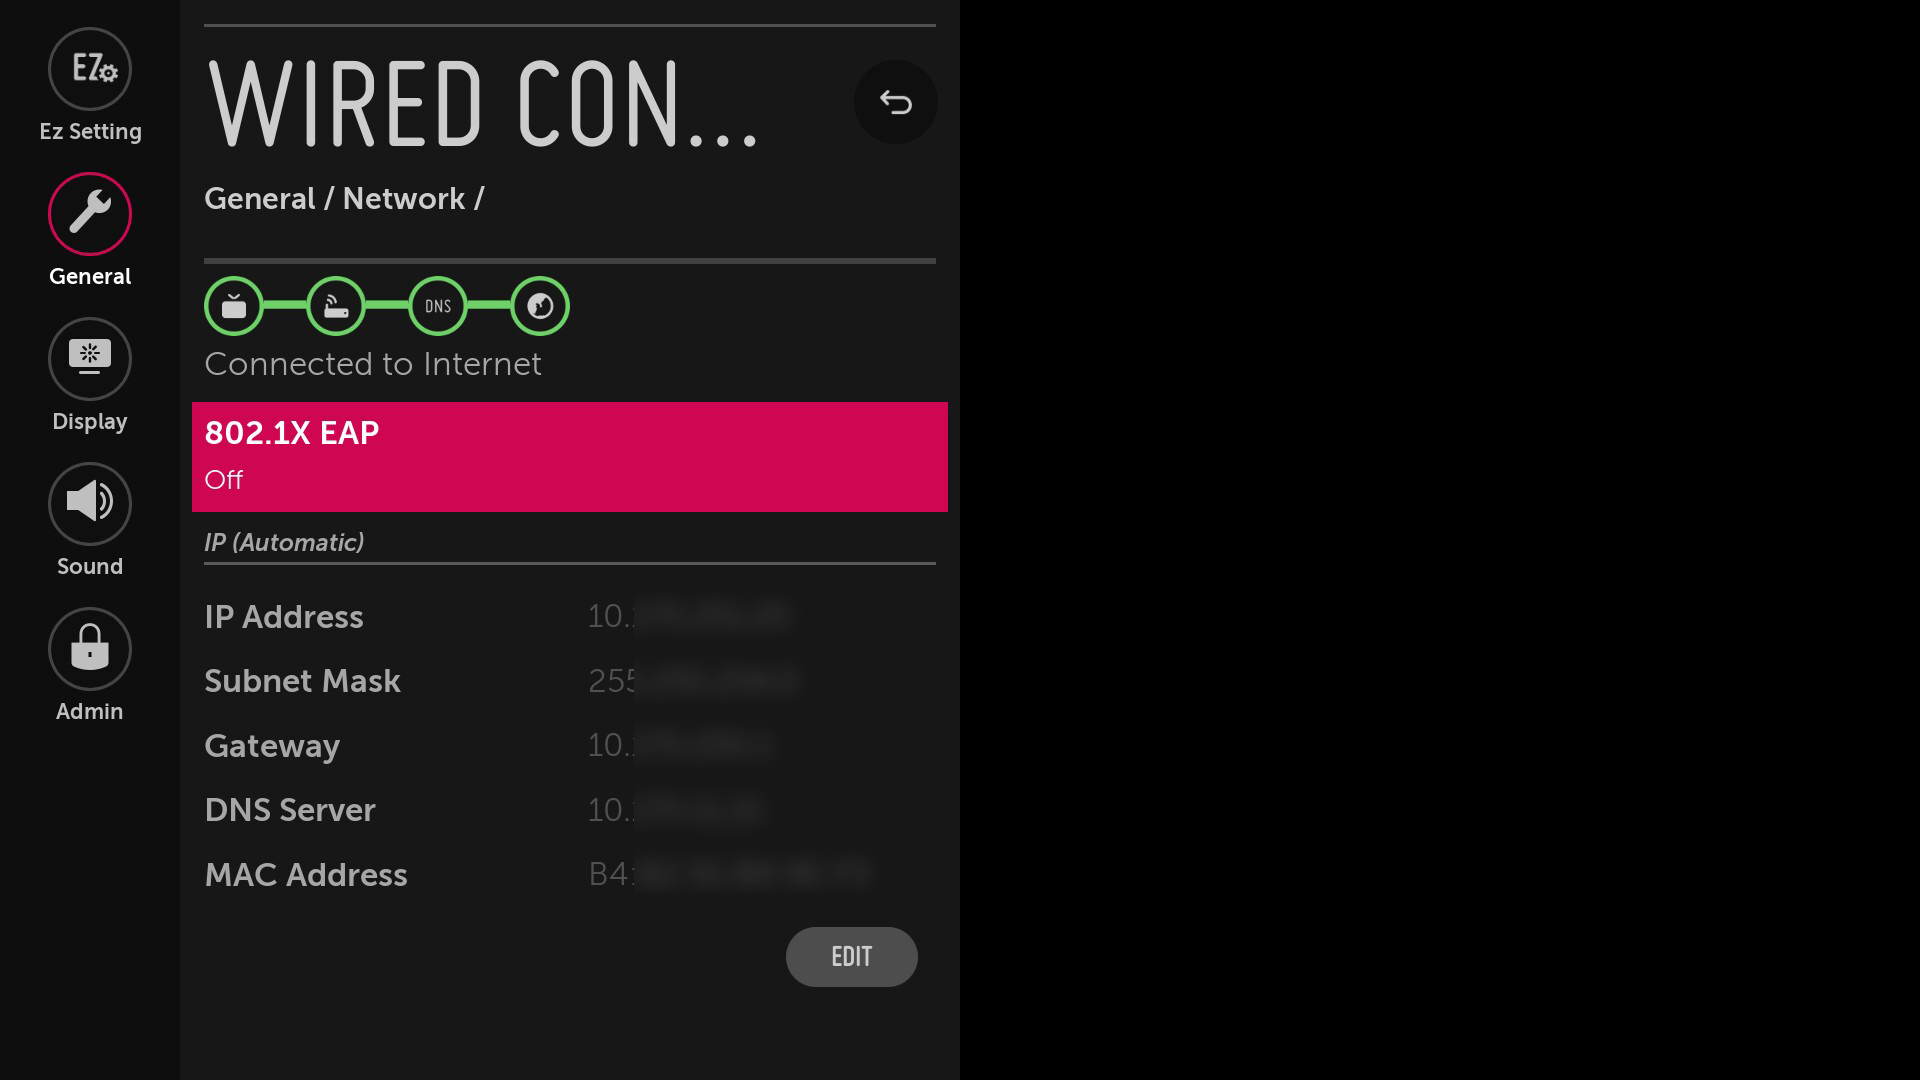
Network settings
GoBright View requires a stable network connection to receive content. We highly recommend connecting the screen using an ethernet cable but a stable WiFi connection will suffice as well. Go to the General Settings and thenNetwork.

Choose either the Wired Connection or Wi-Fi Connection and make sure that the screen is connected to the Internet and has an IP Address.
You can now continue to the next step, Installing the GoBright View App.
webOS 3.0 (beta)
The first things that we’ll address are the general settings of the screen. This includes the time zone, energy-saving settings, and network configuration. All of this is configured within the General Settings by pressing the settings button on the remote and then go to General.
Time& Date
Make sure that Set Automatically is enabled
Navigate to Time Zone and press OK
Make sure the settings match your location
Energy-saving settings
Go back to General settings and go to Picture
Go to Energy Saving and set Energy Saving to Off.
Go back and also set Smart Energy Saving off.
Network Settings
GoBright View requires a stable network connection to receive content. We highly recommend connecting the screen using an ethernet cable but a stable WiFi connection will suffice as well.
Go to General Settings and then Network.
Choose either the Wired Connection or Wi-Fi Connection and make sure that the screen is connected to the Internet and has an IP Address
You can now continue to the next step, Installing the GoBright View App.
Installing the GoBright View App
Now it’s time to install the GoBright View App. This can be done in one of two ways: via internet (preferred) or using a USB drive.
Installing the GoBright View App via Internet (preferred)
Note that an internet connection is required so make sure that the network settings are configured.
The GoBright View app can be installed from the Server Settings menu. The steps to open the Server Settings menu differ between webOS3.0 and webOS3.2+.
webOS 3.0 Server Settings
- Power on the device using the power button on the remote
- Then hold the settings button for at least 5 seconds until an empty popup appears in the top right corner
- On the remote, enter code 8 – 0 – 8 – 0 and press OK
- The server settings menu will now open, please continue below for further instructions
Note: On webOS 3.0 Rotation settings are located in this menu
webOS 3.2, webOS 4.0, webOS 4.1 and webOS 6.0 Server Settings
- Power on the device using the power button on the remote
- Open Settings using the remote (press the [settings] button or the gear icon button)
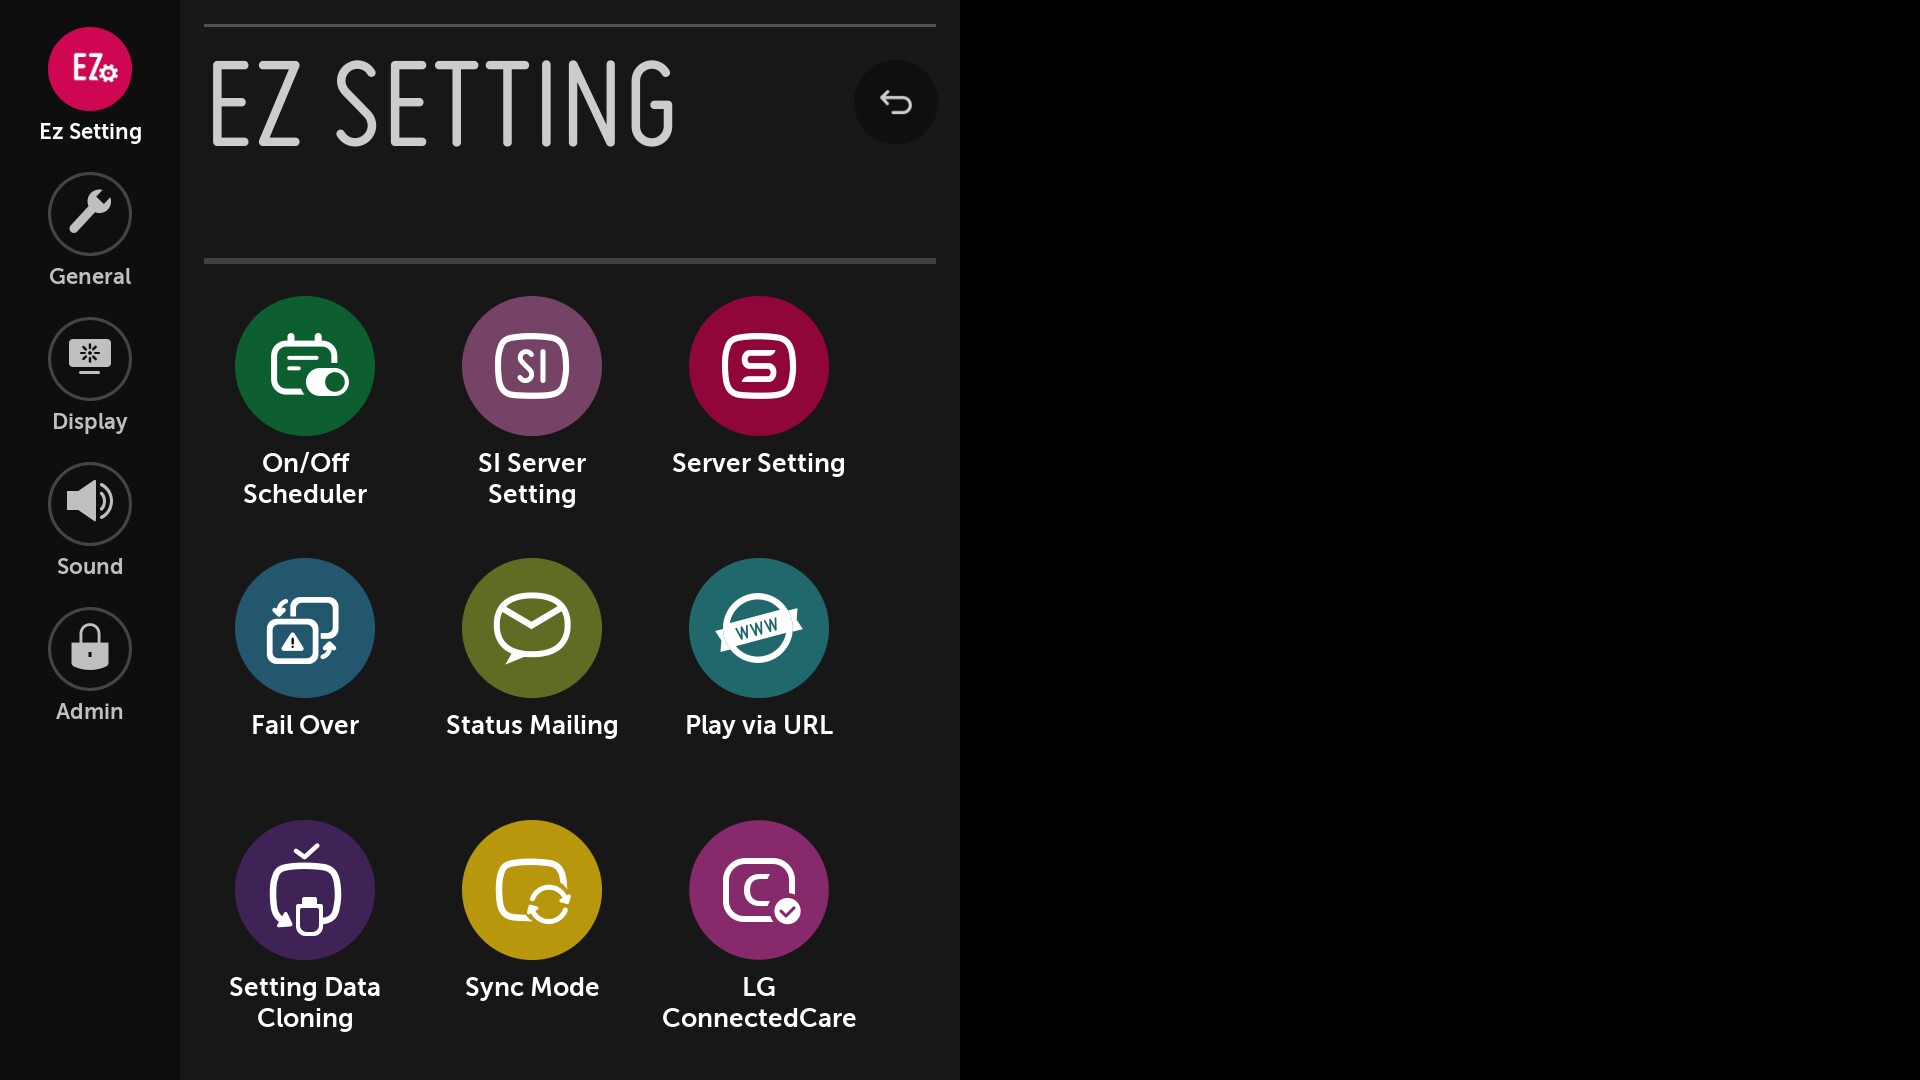
- Go to EZ Setting
- Make sure that Play via URL is Disabled
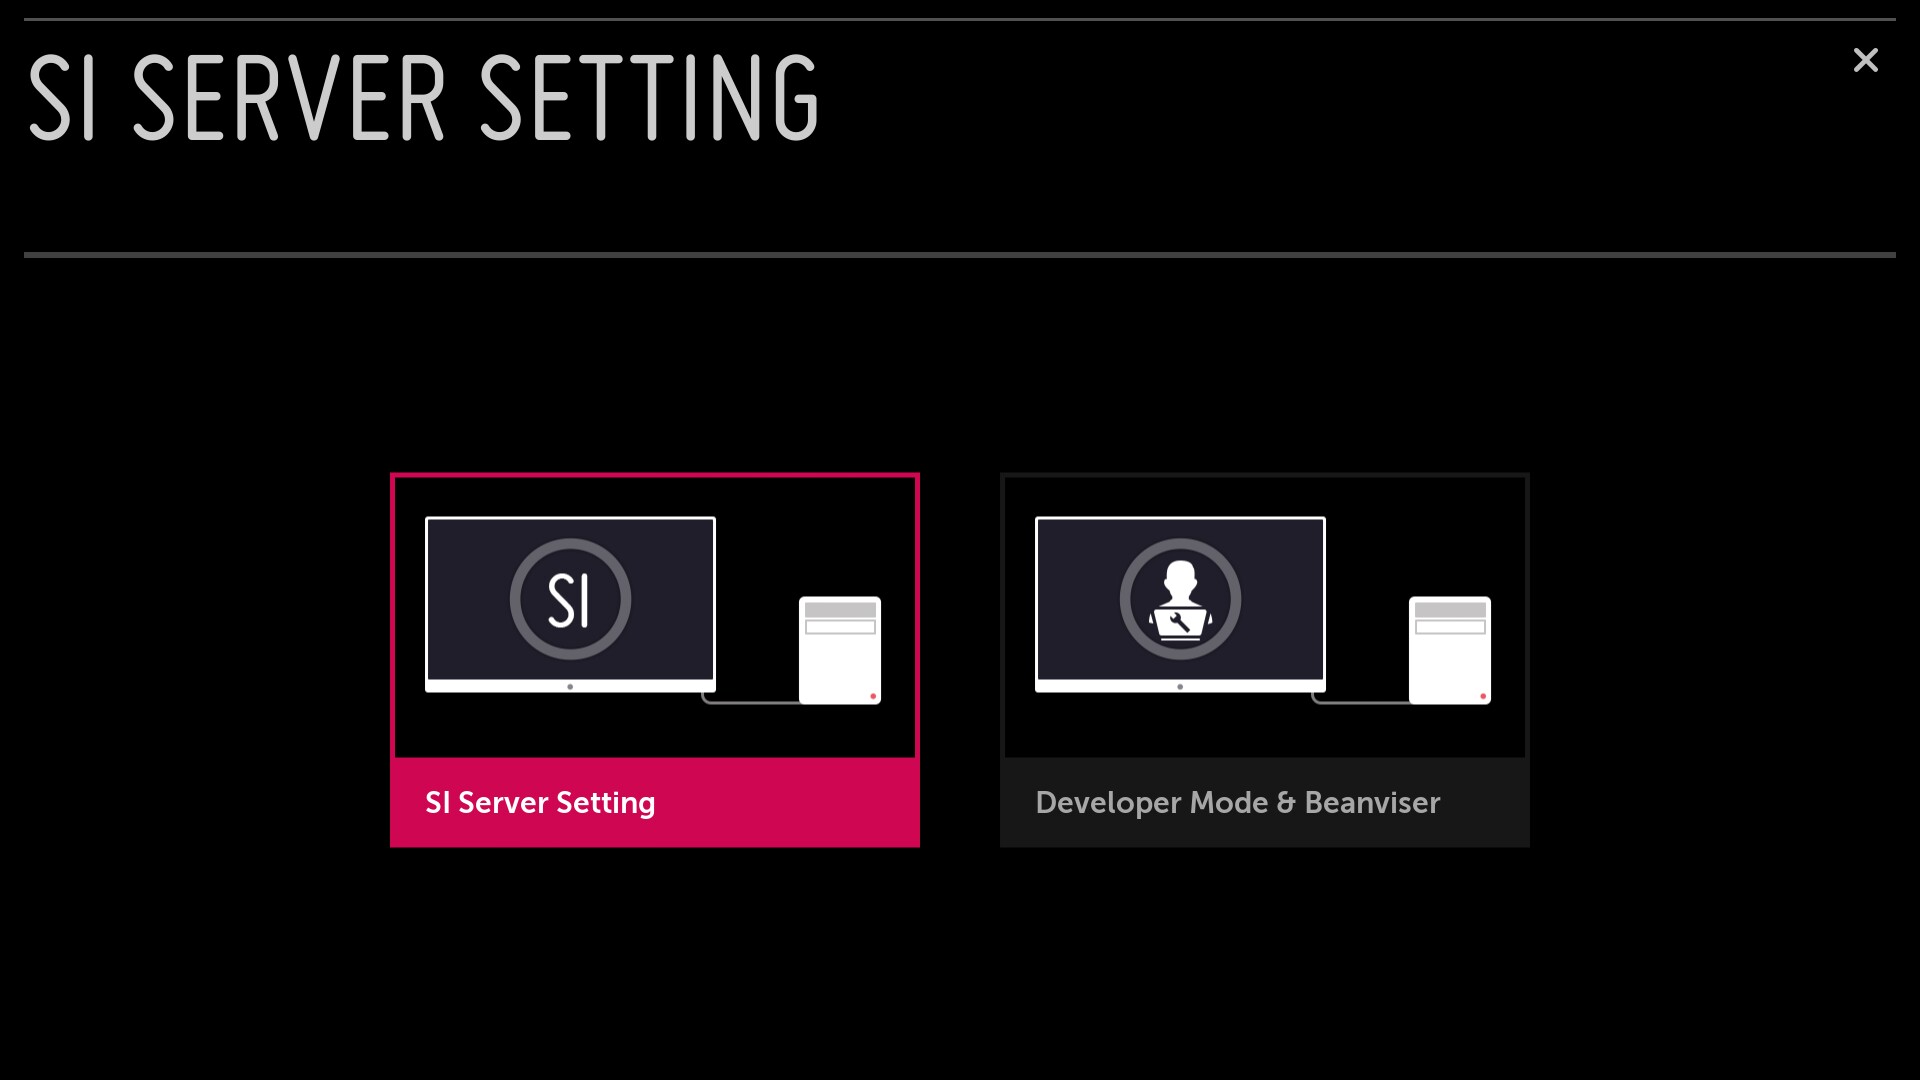
- Go to SI Server Setting and continue
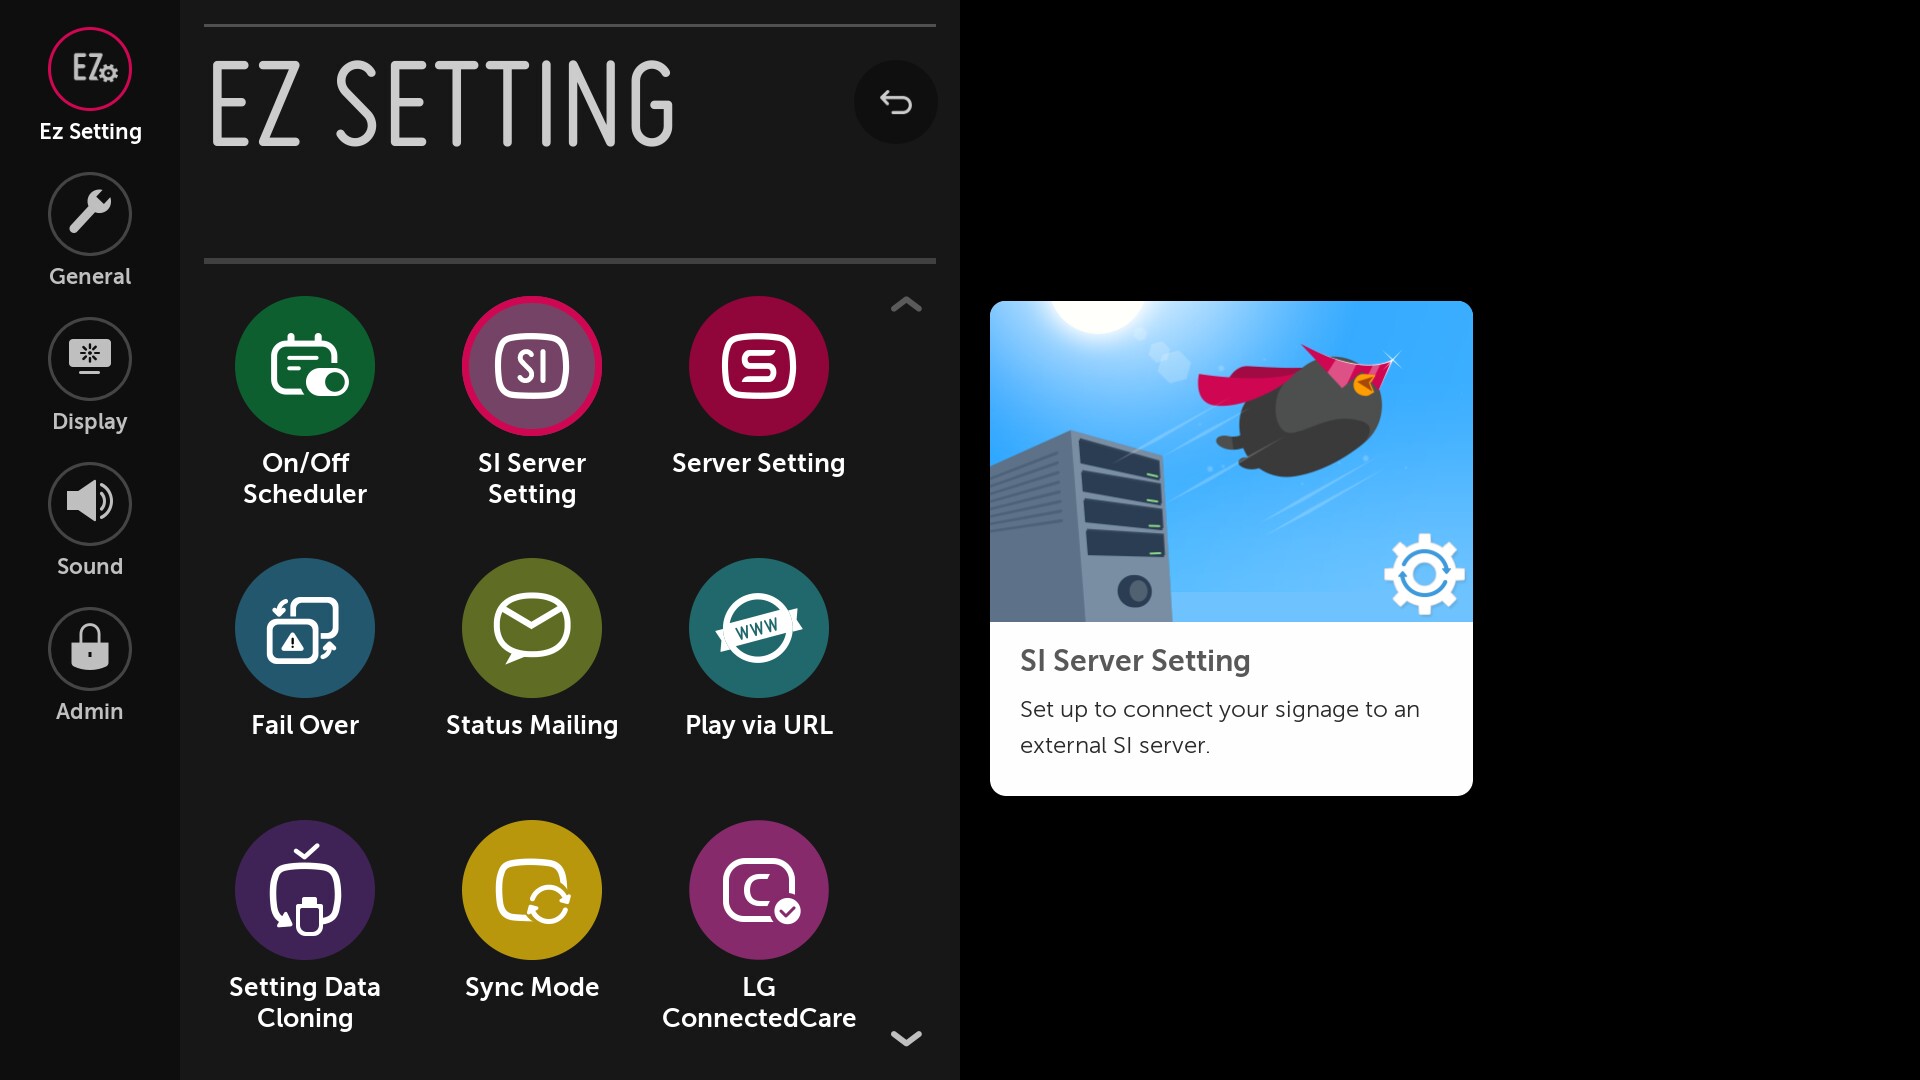
Select SI Server Setting on the left
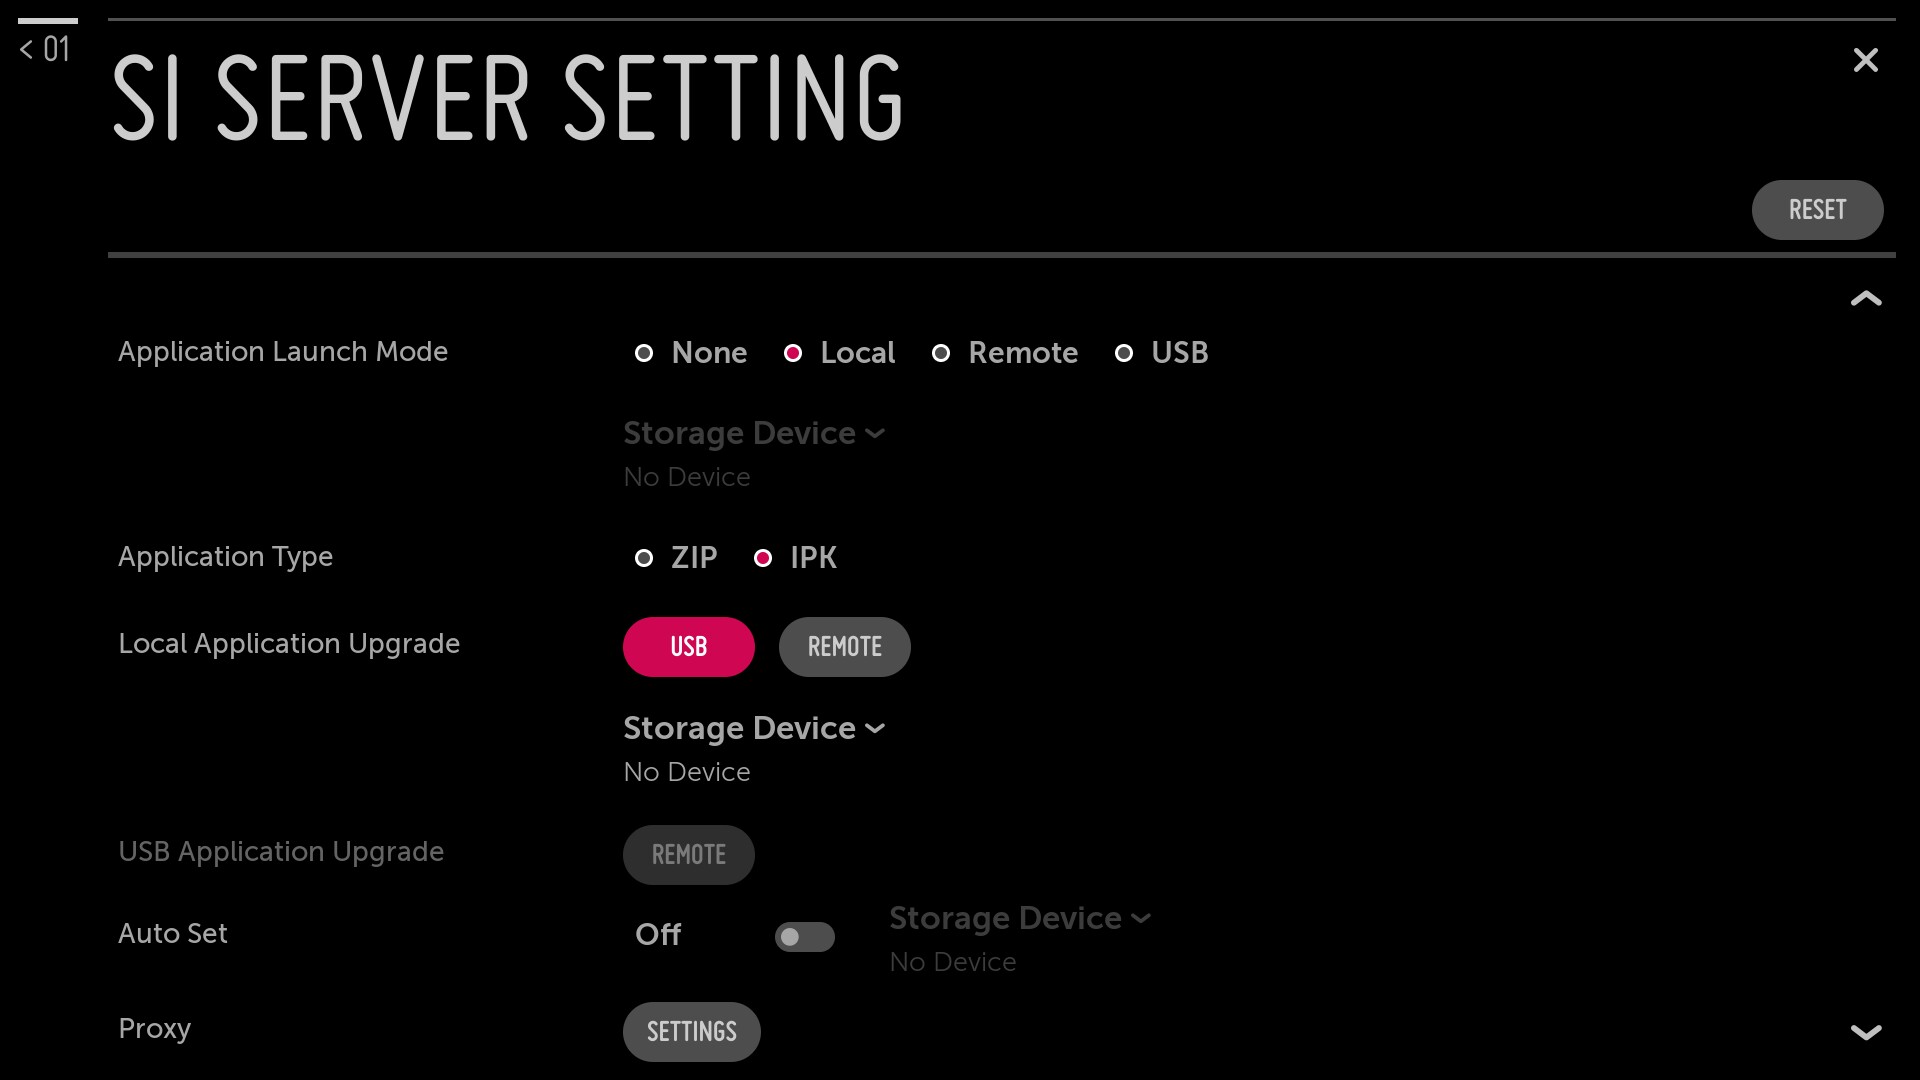
Server Settings Menu
The screenshots below are webOS4.0. For webOS 3.2 looks a bit diffrent but these settings are the same.
Configure these settings in the following order:
- Fully qualified domain name: enabled
- Address / URL: http://install.gobright.cloud/view/webos/latest/ (https: will also work and note the trailing /)
- Application Launch Mode: local
- Local Application type: IPK
- Auto Set: “Off” (this setting is not always visible)
- On webOS 3.0: Rotation is also set in this menu. Rotation on webOS 3.0 is supported from View 4.28.
Note: it’s always possible to go back to this menu to change rotation settings, even after the app is already installed. - For the final step navigate to Local Application Upgrade and select REMOTE. Press the OK button to confirm. In the top right corner, a pop-up displaying “Start Application Upgrade’ will show for a second.
- When this message disappears, TURN OFF the device using the remote. Then, after 10 seconds, TURN ON the device. The GoBright View app will now install and launch.

Installing the GoBright View App using a USB drive
- Download the latest version of the GoBright View App from https://install.gobright.cloud/view/webos/
- Rename the downloaded .ipk file to com.lg.app.signage.ipk – this is important!
- Format the USB drive to FAT32
- Create a folder named application in the root of the USB drive (note: all lower case)
- Place the renamed .ipk file inside the application folder
- Put the USB drive in the webOS device
Then
- Power on the device
- Press the settings button on the remote (the [settings] or the gear icon button)
- Go to SI Server Setting and continue
- Select SI Server Setting on the left
In these settings configure the following in this order:
- Fully qualified domain name: enabled
- Address / URL: http://install.gobright.cloud/view/webos/latest/ (https: will also work and note the trailing /)
- Application Launch Mode: local
- Local Application type: IPK
- Auto Set: “Off” (this setting is not always visible)
- On webOS 3.0: Rotation is also set in this menu. Rotation on webOS 3.0 is supported from View 4.28.
Note: it’s always possible to go back to this menu to change rotation settings, even after the app is already installed. - For the final step navigate to Local Application Upgrade and select USB. Press the OK button to confirm. In the top right corner, a pop-up displaying “Start Application Upgrade’ will show for a second.
- Then, when the pop-up disappears, TURN OFF the device using the remote andfter 10 seconds, TURN ON the device.
The GoBright View app will now install and launch.
After Installing the App
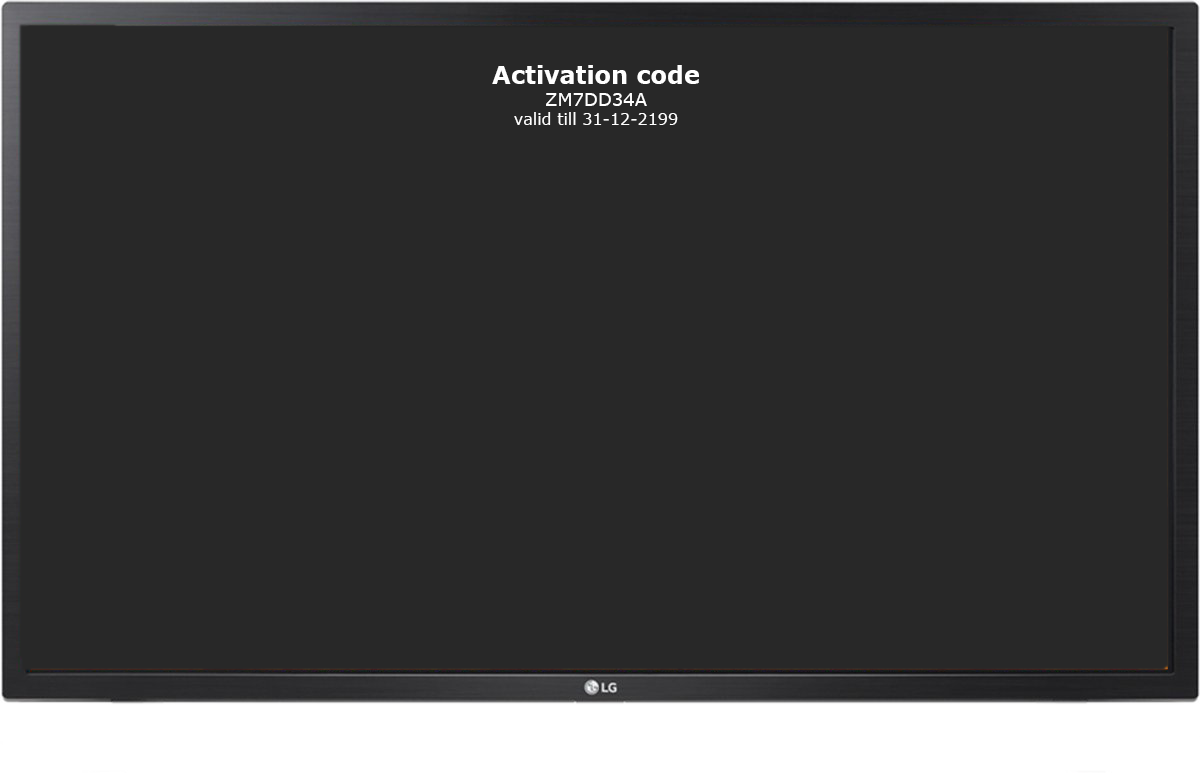
After rebooting the webOS device the GoBright View app should start automatically. An Activation code will be displayed. This code is valid for year and needs to be entered within the GoBright Portal in order to add this device to your GoBright View environment. Please continue reading this article to proceed