Sensor Hardware Setup
Because each sensor has a different usage and range, the setup and placement vary per sensor. There are a couple of general guidelines for each sensor that is being installed.
General information (RF sensor)
All sensors are powered by 3 standard AAA batteries, battery life will be 3 years, but keep in mind you need to use high-quality lithium batteries. Do not install the sensor using screws as it may cause a short circuit, double-sided tape (such as Velcro) is recommended.
The distance between the sensors and the RF Receiver should be:
- Minimum of 2 meters
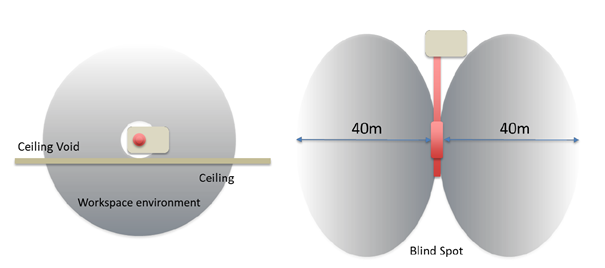
- Maximum of 40 meters (in open space)

The examples above show the correct distance between the sensor and RF Receiver and how walls or other objects might interfere. The last example shows that a minimum distance of at least 2 meters is required for the RF Mini Antenna to function properly.
Occupancy sensor (RF/Wired sensor)
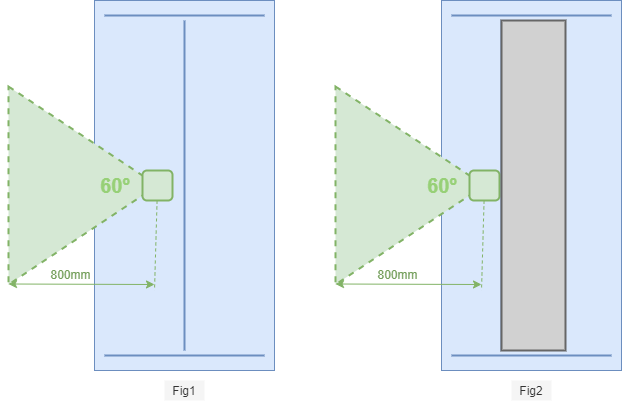
The sensor is positioned under the desk at approximately 400mm from the front edge, with a measurement distance of up to 800mm from the sensor at an angle of 60° (fig1). In some cases, the desk has a metal support bar running down the middle of the desk so the sensor location needs to be in front of the bar (fig2).
Important installation guidelines:
- The desk occupancy sensor is designed to work in an air-conditioned office, and office temperature should not exceed 24 °C
- The desk occupancy sensor should not be placed pointing towards or near a heat source
- The desk occupancy sensor should be pointing towards open space
- The desk occupancy sensor should not be placed near high power sources
PIR Room sensor (RF sensor)
The PIR sensor detects movement, as an alarm sensor would do as well. The difference with an alarm sensor is that when monitoring meeting room occupancy, there are also small movements, like drinking coffee. While an alarm sensor only needs to capture large movements, like walking in a room.
Range for small movements
For small movements, the PIR sensor has an optimal range of 2m with a coverage area of 2.5m by 2.5m at that distance (Fig 1 & Fig 2). If a PIR sensor is placed flat on a standard office ceiling of 2.5-2.7m and a standard conference table is at a height of 0.73m, these levels are reached.
Small movements are typical movements during meetings, like moving your hands and drinking coffee.
Range for larger movements
Large movements, e.g. walking in the room, can be detected by the PIR up to 5 meters.
Occupied/unoccupied
The PIR sensor detects occupation immediately, but has a timeout of approx. 13 minutes before going to unoccupied.
For example: when a person enters the room, it will send the ‘occupied’ signal immediately. When the person(s) stay in the room, every now-and-then (within a timeframe of 1-10 minutes) smaller or larger movement is detected, and the PIR sensor will stay in the occupied status. After not detecting any movement for 13 minutes, the PIR sensor will send out the ‘unoccupied’ signal.
Positioning & detection
For ideal range and measurement, the PIR sensor is placed at an angle towards the location where people use the room. It does not have to placed in a corner, but can also be attached to the ceiling in the center of the room. Note that brackets to fix the sensor are not included by default.
To be able to detect movement, the PIR should not be blocked (e.g. by walls, furniture, people sitting right in front of the sensor, etc). For optimal detection, detecting small movements is great, but because of the 13 minutes timeout, it is rare to have an occupied room without large movements in 13 minutes.
For smaller rooms (e.g. 4-8 people, 5×5 meter) it is normally sufficient to place the PIR flat on the ceiling, in the center of the table. For larger rooms (boardrooms, etc.) it might be necessary to place multiple PIR sensors.
Please be aware to not pickup movement from neighboring rooms, hallways, etc. especially when the PIR sensor is installed in small rooms.
Do not place the sensor into direct sunlight, or any infrared sources.

Gateway & RF antenna
Before placing the Gateway + RF antenna in a hard to reach place it is advised to install the GoBright app and activate the device first. Review the information to configure the RF Sensors & Gateway + RF antenna here.
Hardware overview:

The RF Receiver is connected via cat5/6 network cables and is placed above the ceiling. In most situations, there would be one or two receivers per floor dependent upon the structure and shape of the floor. The example below illustrates where the RF Receivers should be placed for the best coverage within different structures.
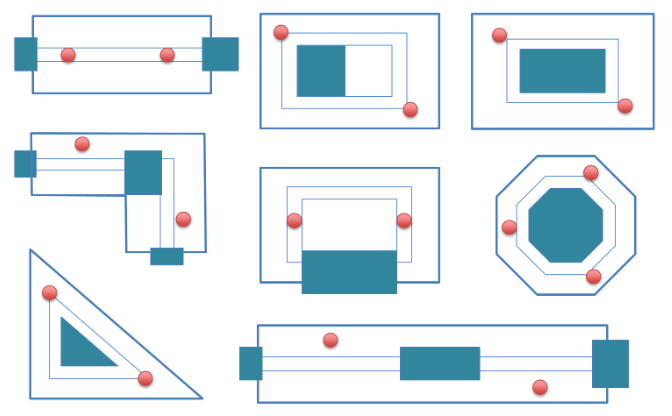
Conceptual view of the range of one receiver:
Example of installation in L-shaped floorplan, with two receivers:
