SharePoint News Widget - Migration Guide
URGENT – Action Required by April 2, 2026
Azure ACS authentication is being retired. All SharePoint News widgets must be migrated to Microsoft Graph v2.0 before this date to avoid service interruption.
1. Migration Overview
Why Migrate?
- Azure ACS Retirement: Legacy authentication (accounts.accesscontrol.windows.net) shuts down April 2, 2026
- ROPC Deprecation: Password grant types disabled May 1, 2026
- Security: Modern OAuth 2.0 with enhanced security
- Performance: Native JSON API instead of XML parsing
| ❌ Legacy Version | ✅ Modern Version |
| Azure ACS authentication | Microsoft Graph v2.0 |
| SharePoint REST API (api/web) | Graph API (/sites/…/lists) |
| XML data parsing | Native JSON handling |
| PowerShell tenant configuration | Azure AD app registration |
2. Prerequisites
Required Access & Information
- Azure AD Global Administrator or Application Administrator role
- SharePoint Administrator access (for verification)
- Current widget configuration (Client ID, Tenant ID, etc.)
- List of SharePoint sites using the widget
- Test SharePoint site with news posts for validation
Note: The old PowerShell command (set-spotenant -DisableCustomAppAuthentication $false) is no longer needed and can be removed after migration.
3. Azure AD App Registration
Follow the steps bellow:
Step 3.1: Create New App Registration
- Navigate to Azure Portal → Azure Active Directory → App registrations
- Click “New registration”
-
Fill in the details:
Name:Supported account types: Single tenant only -Leave blank (not needed for client credentials) - Click “Register”
Step 3.2: Configure API Permissions
- In your new app registration, go to “API permissions”
- Click “Add a permission” → “Microsoft Graph” “Application permissions”
-
Click “Application permissions” and Add one of the following permissions:
Permission Purpose When to Use Sites.Read.AllRead all SharePoint sites and lists Simple deployment, testing environments Sites.SelectedAccess only specifically granted sites Production environments, enhanced security
⚠️ Choose One: Use either Sites.Read.All OR Sites.Selected, not both. Sites.Selected requires additional configuration (see 4 Sites.Selected Configuration (Optional – Enhanced Security). - Click “Add permissions”
- IMPORTANT: Click “Grant admin consent” and confirm
Sites.Selected for production environments and grant access only to specific SharePoint sites that need the widget.
Step 3.3: Generate Client Secret
- Go to “Certificates & secrets” → “Client secrets”
- Click “New client secret”
- Set description:
SharePoint News Widget Secret - Set expiration: 24 months (recommended)
- Click “Add”
- IMPORTANT: Copy the secret value immediately (it won’t be shown again)
Step 3.4: Note Required Information
Copy the following values from your app registration’s “Overview” page:
| Field | Azure Portal Location | Used In Widget |
|---|---|---|
| Application (client) ID | Overview → Application (client) ID | Client ID parameter |
| Directory (tenant) ID | Overview → Directory (tenant) ID | Tenant ID parameter |
| Client Secret | Certificates & secrets → Value (copied above) | Client Secret parameter |
4. Sites.Selected Configuration (Optional – Enhanced Security)
When to Use Sites.Selected
- Production environments where security is paramount
- Multi-site tenants where the widget should only access specific sites
- Compliance requirements that mandate least-privilege access
- Large organizations with many SharePoint sites
Step 4.1: Configure Sites.Selected Permission
- In your Azure AD app registration, go to “API permissions”
- Remove
Sites.Read.Allif already configured - Add
Sites.Selectedapplication permission - Grant admin consent for the new permission
Step 4.2: Grant Site-Specific Access via Graph Explorer
For each SharePoint site that should use the widget, follow these steps:
4.2.1: Get the Site ID
- Open Microsoft Graph Explorer
- Sign in with your admin account
-
Make a GET request to find your site:
- Copy the full
idfrom the response (format:hostname,guid,guid)
4.2.2: Check Current Permissions (Optional)
Verify that no permissions are currently granted:
The response should be empty ({"value": []}) for a new Sites.Selected app.
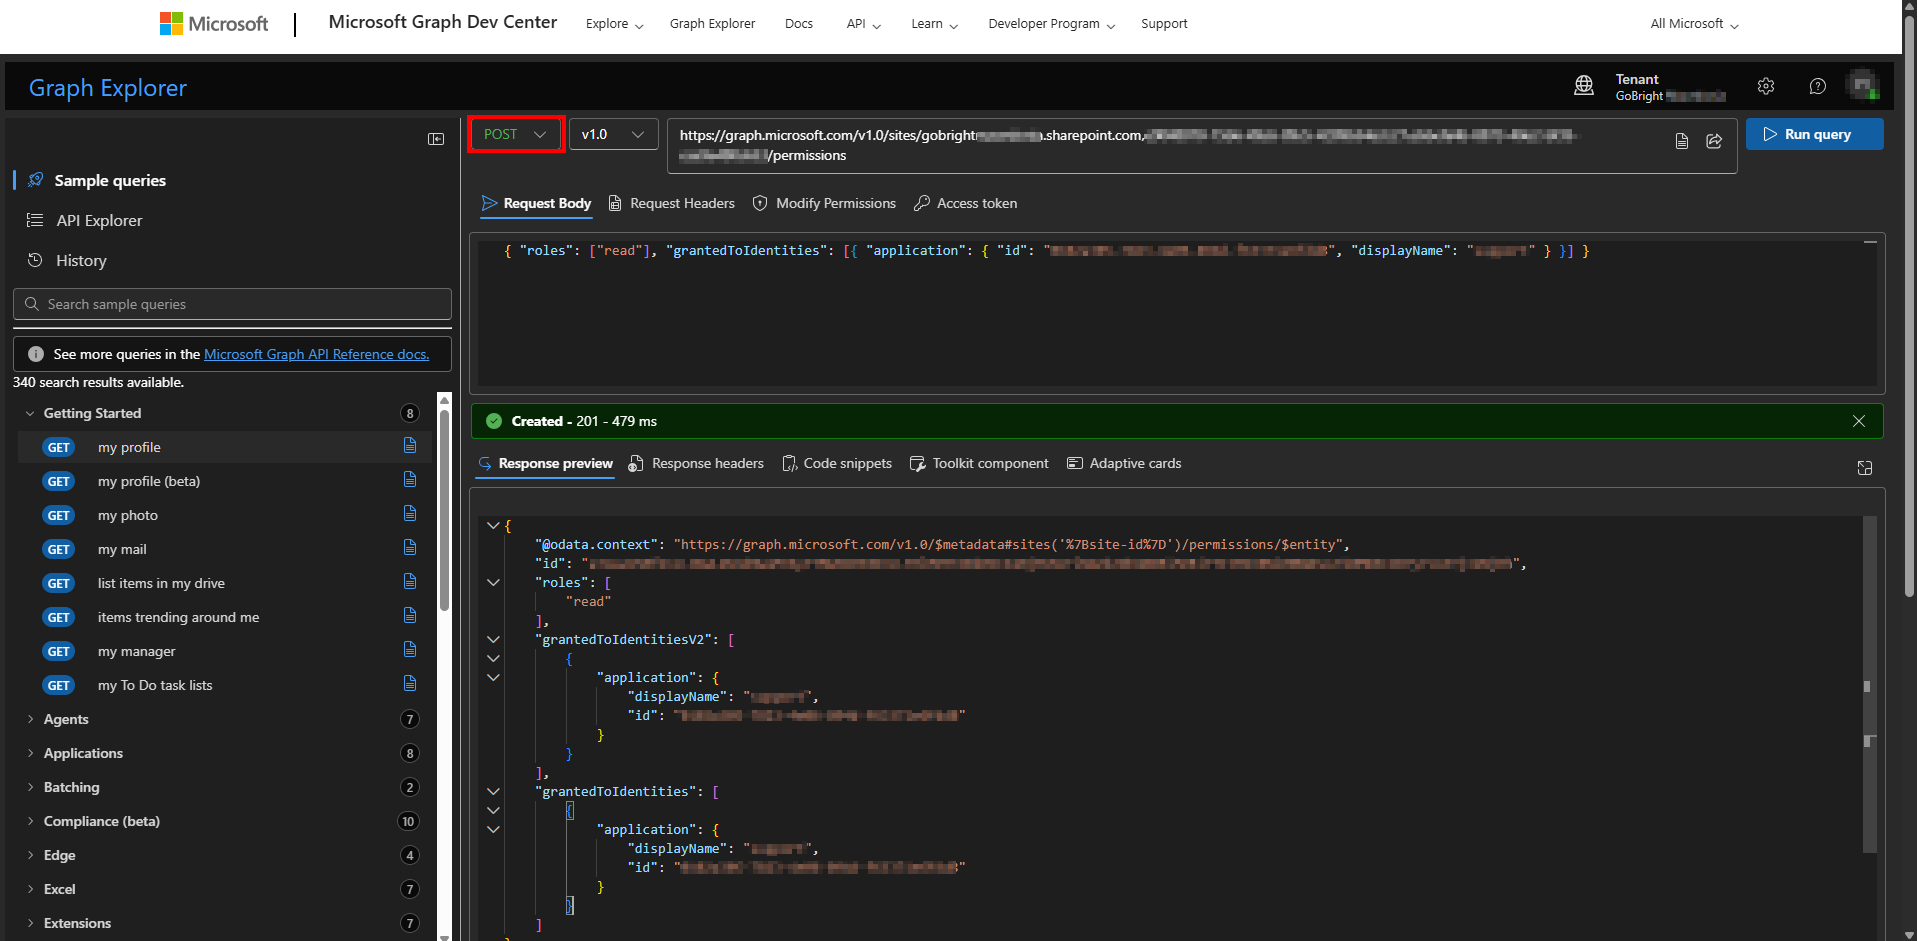
4.2.3: Grant Site Access
-
Make a POST request to grant your app access to the specific site:
POST https://graph.microsoft.com/v1.0/sites//permissionsBody:{ "roles": ["read"], "grantedToIdentities": [{ "application": { "id": "", "displayName": "" } }] } - Replace the placeholders:
-
: The full site ID from step 4.2.1 -
: Application (client) ID from Azure AD -
: Display name from Azure AD
-
Step 4.3: Verify Access Granted
- Repeat the GET permissions call from step 4.2.2
GEThttps://graph.microsoft.com/v1.0/sites//permissions - You should now see your application listed with read permissions
- The response should include your app’s details and granted roles
Step 4.4: Repeat for Additional Sites
If you have multiple SharePoint sites that use the widget, repeat steps 4.2.1 through 4.3 for each site. Each site requires individual permission grants when using Sites.Selected.
5. SharePoint Preparation
Follow the steps bellow:
Step 5.1: Verify SharePoint Sites
- Ensure your SharePoint sites have news posts published
- Verify that custom properties (if used) are still configured:
- Custom Yes/No columns for filtering (e.g., “ShowOnSignage”)
- Custom text columns for excerpts (e.g., “CustomDescription”)
- Test that images are uploaded to SharePoint (not external links)
Step 5.2: Remove Old PowerShell Configuration (Optional)
The following PowerShell command is no longer needed and can be removed:
# This is NO LONGER REQUIRED for Graph v2.0 set-spotenant -DisableCustomAppAuthentication $false
6. Import the SharePoint News Widget
Follow the steps below to download and import the new SharePoint News widget into your environment.
Step 6.1: Download the Widget
You can download the widget from the following location: http://install.gobright.cloud/temp/widget/Widget-SharePoint_News_Widget.gbexport
Step 6.2: Uploading the Widget
Once the widget has been downloaded, you can upload it into your GoBright environment.
- Select the Management tab
- Go to Widgets & Data Sources.
- Select the folder where you want to store the widget (e.g. Main folder).
- Select Import.
- In the dialog that appears, select Select.
- Browse to the folder where you saved the downloaded widget file
- Select Open.
- Confirm by clicking on OK in the prompt Import successful
The widget will now be imported successfully and is ready for use.
Step 6.3: Updating the SharePoint Widget in the Templates
If the SharePoint widget is already using and you import it on the previous steps, the old widget will be overwritten.
After doing this, go to the template(s) where the ‘old SharePoint widget‘ was used. At the top of the template, select the Update button.
Once this is done, the widget will be updated with the new ‘List ID’ field will be added.
All values that were already filled in will remain on the same place. Next, fill in the new values that have changed, as shown in the table in step 6.2.
Don’t forget to save the changes at the end in the top right corner.
Step 6.4: Updating the SharePoint Widget in Playlists/Slides
After updating the template(s), go to each playlist where the widget is active. In the playlist preview, you will see the same Update button at the top. When you select this button, the template will be copied into the slide so all values are automatically updated. That means you do not need to fill them in manually, per widget.
Repeat this step for every playlist in which the template(s) are used.
Once everything has been updated, update the content by selecting Update Content and the players downloading the newest content.
7. Widget Migration
Follow the steps bellow:
Step 7.1: Update Widget Code
- Replace the old SharePoint News widget DataSource with the new Graph v2.0 version
- Add the new List ID parameter (see Step 7.3)
- Deploy the updated widget to your GoBright platform
Step 7.2: Get List ID from SharePoint
In your GoBright widget configuration, update only the authentication fields:
| Parameter | Old Value (Legacy) | New Value (Graph v2.0) |
|---|---|---|
| Client ID | Old ACS Client ID | New Azure AD Application ID |
| Client Secret | Old ACS Client Secret | New Azure AD Client Secret |
| Tenant ID | Same | Same (unchanged) |
| List ID | Not required | Required: Get from Site Contents |
Step 7.3: Update Authentication Information
The new Graph v2.0 widget requires a List ID parameter. Follow these steps to retrieve it.
https://yourtenant.sharepoint.com/sites/yoursite)- Go to Site Contents
- Find the list you want to use (typically “Site Pages” for news content)
- Click the three dots (⋯) next to the list name
- Select “Settings”
- Copy the List ID from the URL:
📝 Benefit: This approach works with any SharePoint list (Site Pages, Custom Lists, Document Libraries) and eliminates site compatibility issues.
8. Troubleshooting
Common Issues & Solutions
Authentication Errors
| Error | Cause | Solution |
|---|---|---|
| “Invalid client credentials” | Wrong Client ID or Secret | Verify credentials in Azure AD app registration |
| “Insufficient privileges” | Missing API permissions | Add Sites.Read.All permission and grant admin consent |
| “Tenant not found” | Wrong Tenant ID | Copy correct Tenant ID from Azure AD |
Data Retrieval Issues
| Issue | Cause | Solution |
|---|---|---|
| No news posts shown | No recent posts or wrong date filter | Check date range parameter and verify published posts exist |
| Images not loading | Missing BannerImageUrl field | Ensure news posts have banner images set in SharePoint |
Sites.Selected Specific Issues
| Error | Cause | Solution |
|---|---|---|
| “Access denied” when retrieving data | Site not granted to application | Follow Step 4.2 to grant site-specific permissions |
| “Site not found” with Sites.Selected | Missing permissions for site discovery | Ensure site permissions are granted via Graph Explorer POST request |
| “Forbidden” on specific site | Permission granted to wrong site ID | Verify full site ID used in step 4.2.1 matches the site being accessed |
| Works in Graph Explorer but fails in widget | Using user token vs application token | Ensure widget uses application-only authentication (client_credentials) |
Performance Issues
- Slow loading: Reduce max items or days filter to limit data size
- Timeout errors: Check network connectivity to graph.microsoft.com
- Rate limiting: Implement proper caching (already included in new version)
Getting Help
- Azure AD Issues: Check Azure Portal → Azure AD → App registrations → [Your App] → Overview for configuration
- SharePoint Issues: Verify in SharePoint Admin Center that sites are accessible
- Sites.Selected Permissions: Use Graph Explorer to test site access and verify permissions
- GoBright Support: Contact with error messages and configuration details
- Microsoft Graph Explorer: Test API calls at
developer.microsoft.com/graph/graph-explorer
🔍 Debugging Sites.Selected: If experiencing permission issues, use Graph Explorer to test the exact API calls:
- GET site info:
/sites/.sharepoint.com:/sites/ - GET site permissions:
/sites//permissions - GET Site Pages list:
/sites//lists/Site Pages/items
Migration Complete!
Congratulations! Your SharePoint News widget is now using modern Microsoft Graph v2.0 authentication and will continue working reliably beyond the April 2026 deadline.
Key Benefits Achieved:
- ✅ Future-proof authentication
- ✅ Enhanced security
- ✅ Better performance
- ✅ Simplified setup (no more PowerShell)
- ✅ Full backward compatibility